web中实现Google登录和firebase登录以及google token转firebase token


一、前言
在web的前端开发中,实现第三方授权登录的场景和平台很多,最常见的比如Google登录、Apple登录、Facebook登录,国内常见的有比如微信登录、支付宝登录,这些都是需要依赖他们这些第三方平台的授权流程才能拿到登录用户的身份id或者access token的。
在web开发中,实现第三方登录的形式,我的经验告诉我大概可以分为3种:
-
- 引入第三方平台的库,在vue或者react或者原生div等按钮组件中,加一些标签属性或者配置。当点击后,第三方平台的函数会去执行授权流程。
这种场景比如,使用谷歌的统一登录按钮:
示例
<div id="g_id_onload"
     data-client_id="YOUR_GOOGLE_CLIENT_ID"
     data-login_uri="https://your.domain/your_login_endpoint"
     data-your_own_param_1_to_login="any_value"
     data-your_own_param_2_to_login="any_value">
</div>
具体解释可自行参考:https://developers.google.com/identity/gsi/web/tools/configurator?hl=zh-cn
-
- 引入第三方平台的库,使用javascript方法去调用第三方库的js api实现授权流程。
还是拿Google登录举例:
示例
<script src="https://accounts.google.com/gsi/client" async></script>
示例脚本
<script>
  window.onload = function () {
    google.accounts.id.initialize({
      client_id: 'YOUR_GOOGLE_CLIENT_ID',
      callback: handleCredentialResponse
    });
    google.accounts.id.prompt((notification) => {
        if (notification.isNotDisplayed() || notification.isSkippedMoment()) {
            // try next provider if OneTap is not displayed or skipped
        }
    });
  }
</script>具体可自行查看:https://developers.google.com/identity/gsi/web/guides/use-one-tap-js-api?hl=zh-cn
-
- 使用重定向的方式,在web当前域名网页下,跳转第三方平台的授权页,用户登录同意授权后,第三方平台的授权页会重定向回web的域名网页,重定向回来的web网页中会携带第三方平台加上的授权结果参数。前端开发同学,需要自己从网址参数读取参数值,并且将参数值通过接口请求发送给自己的后端同学进行处理。
还是拿Google登录举例,通过重定向授权流程,最后重定向到的网址是:
示例授权返回后的网址
https://oauth2.example.com/callback#access_token=4/P7q7W91&token_type=Bearer&expires_in=3600如上所示,会有一些参数拼接在前端同学的授权返回网址上。
以上大概是目前在web前端开发中遇到的几种授权登录场景。
提示:显示网页的设备环境是多种多样的,对于在网页授权过程中,如果是弹出式授权窗口(iframe)的形式,经常会被一些设备或者一些app的webkit给拦截掉,从而导致授权失败。
二、前端web开发中实现Google登录的方法
根据前言中所提到的一些信息,相信大家对授权登录的集成方式有了大概的理解,在这一节,我们聊一下如何优雅的实现一个不会被webkit拦截的授权登录方式。所以我选择重定向的方式。
Google对OAuth 2.0 的授权流程是比较支持的,当然你也可以继续使用js API的方式,这里我选择OAuth 2.0的标准。
- 需要在Google console中创建项目,得到一个client id;
- 需要在Google console的项目中配置重定向网址;
- web前端中实现重定向的代码。
官方有给出文档:https://developers.google.com/identity/protocols/oauth2/javascript-implicit-flow?hl=zh-cn
2.1 实现Google登录必要的配置
需要在Google的console控制台,新建一个项目,然后配置web的一些授权网域。
Google的console网址:https://console.cloud.google.com/
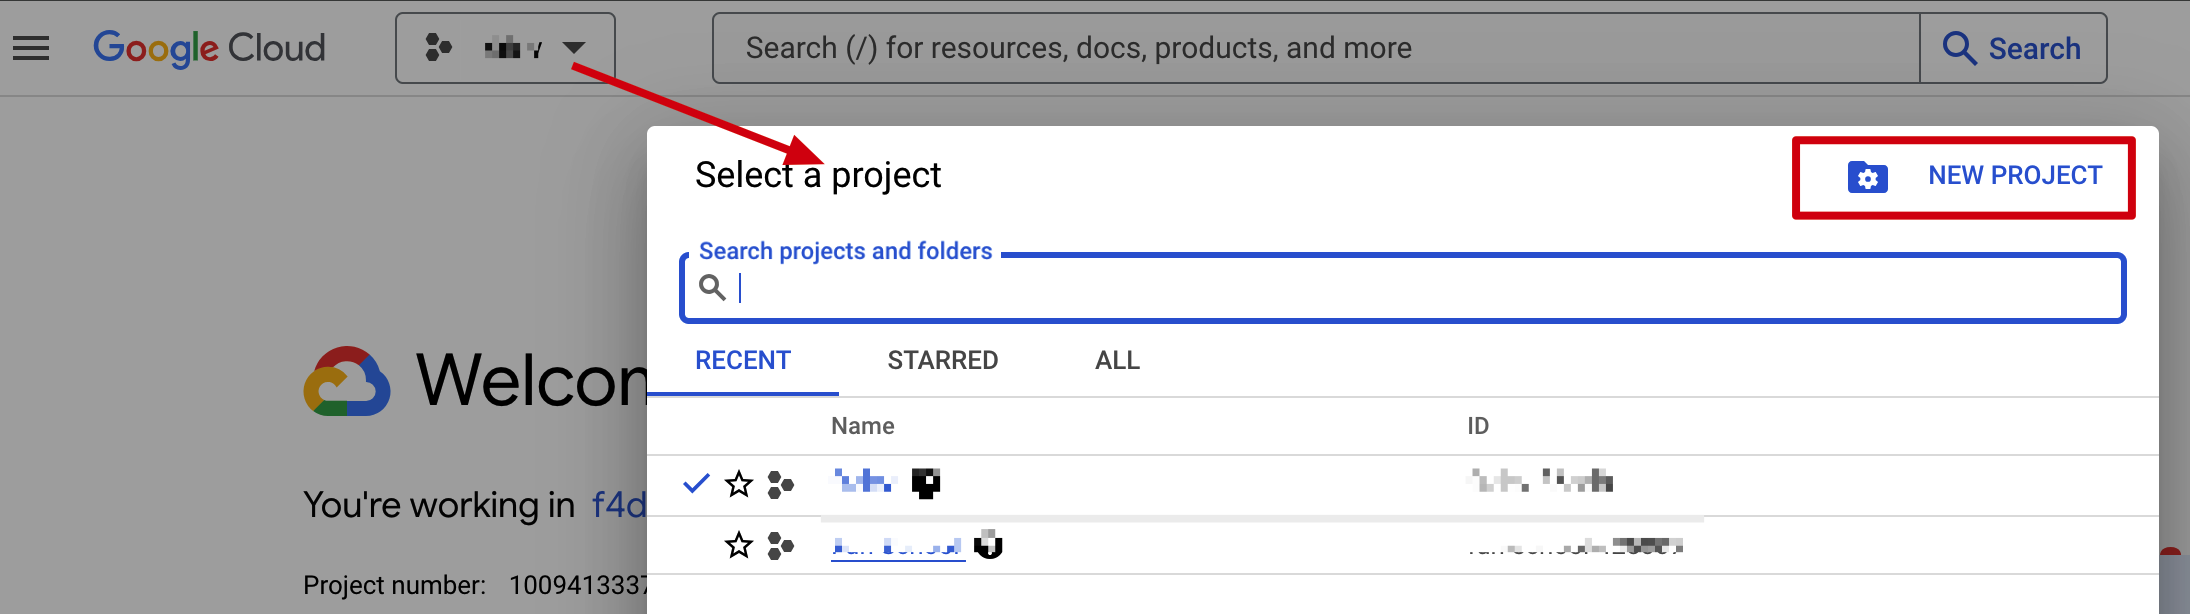
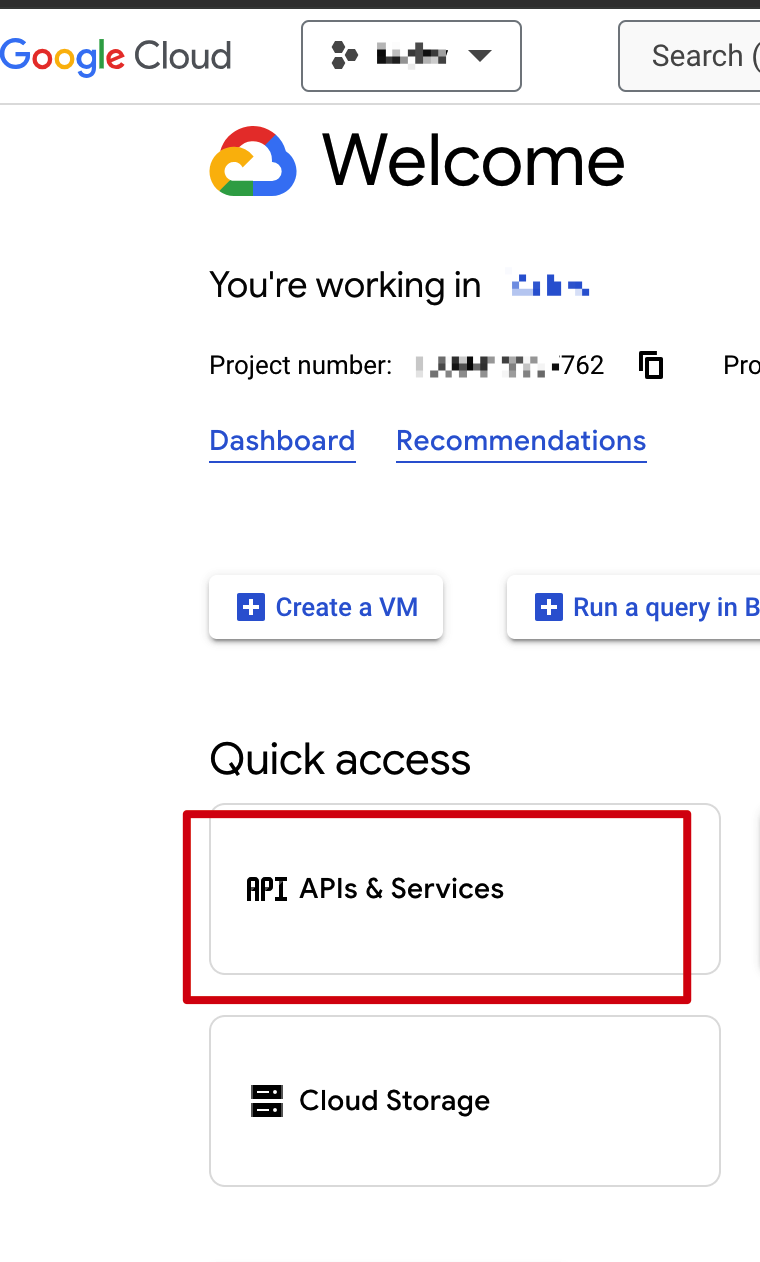
在Google console中创建一个项目后,需要配置apis & services
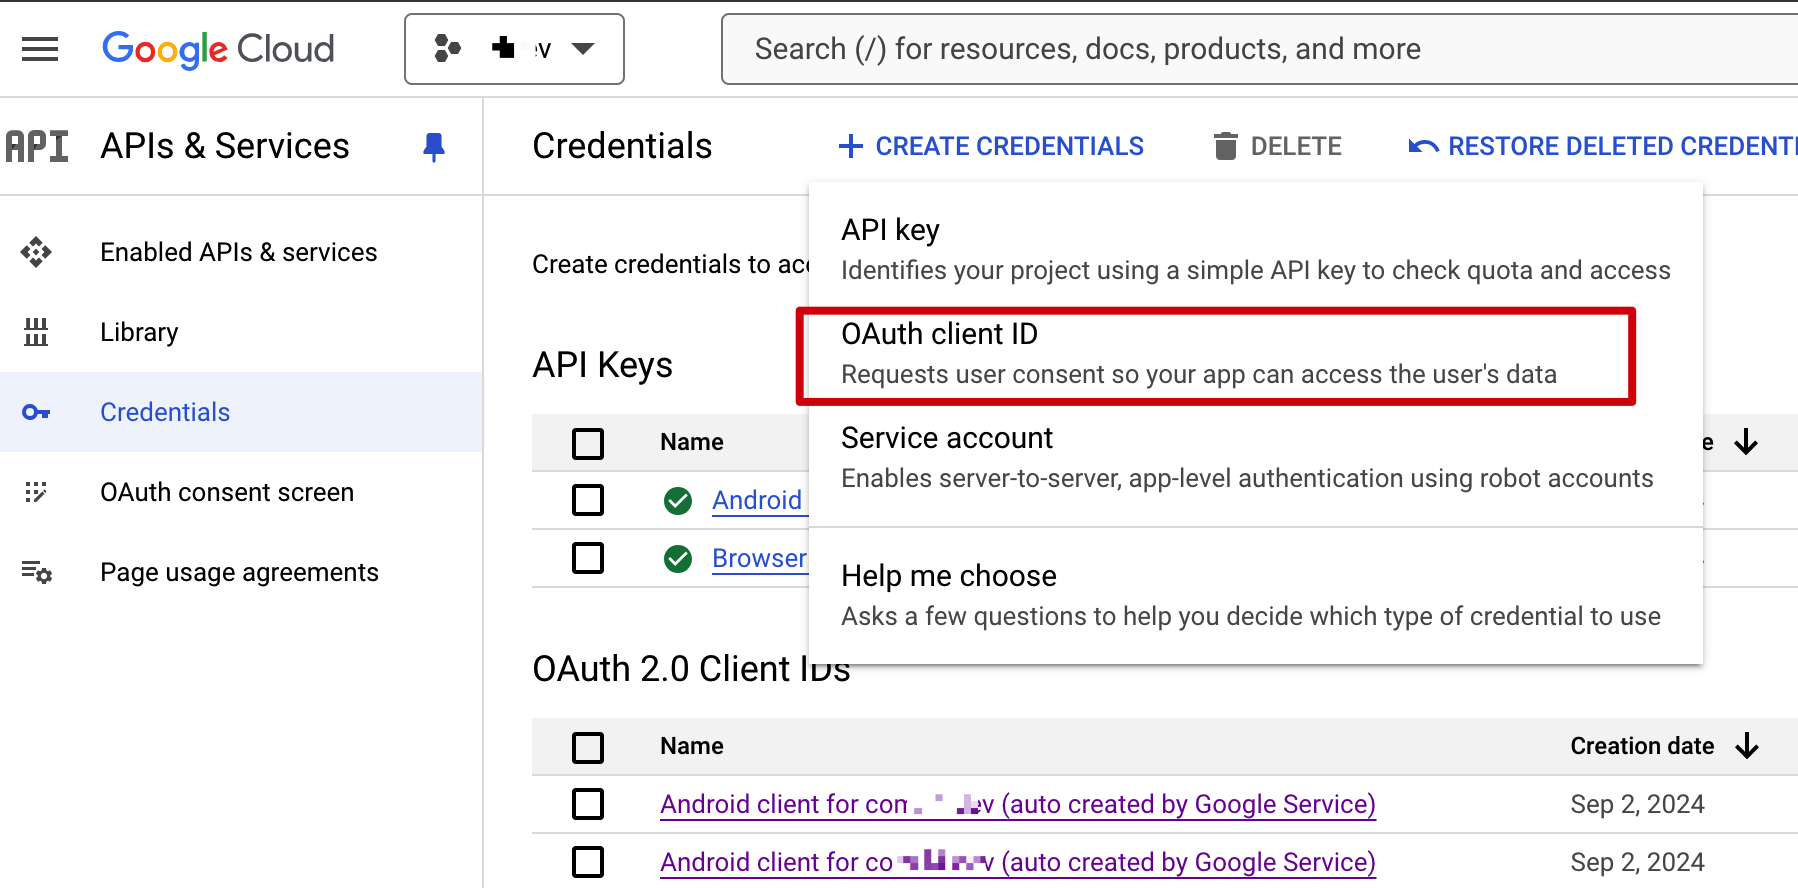
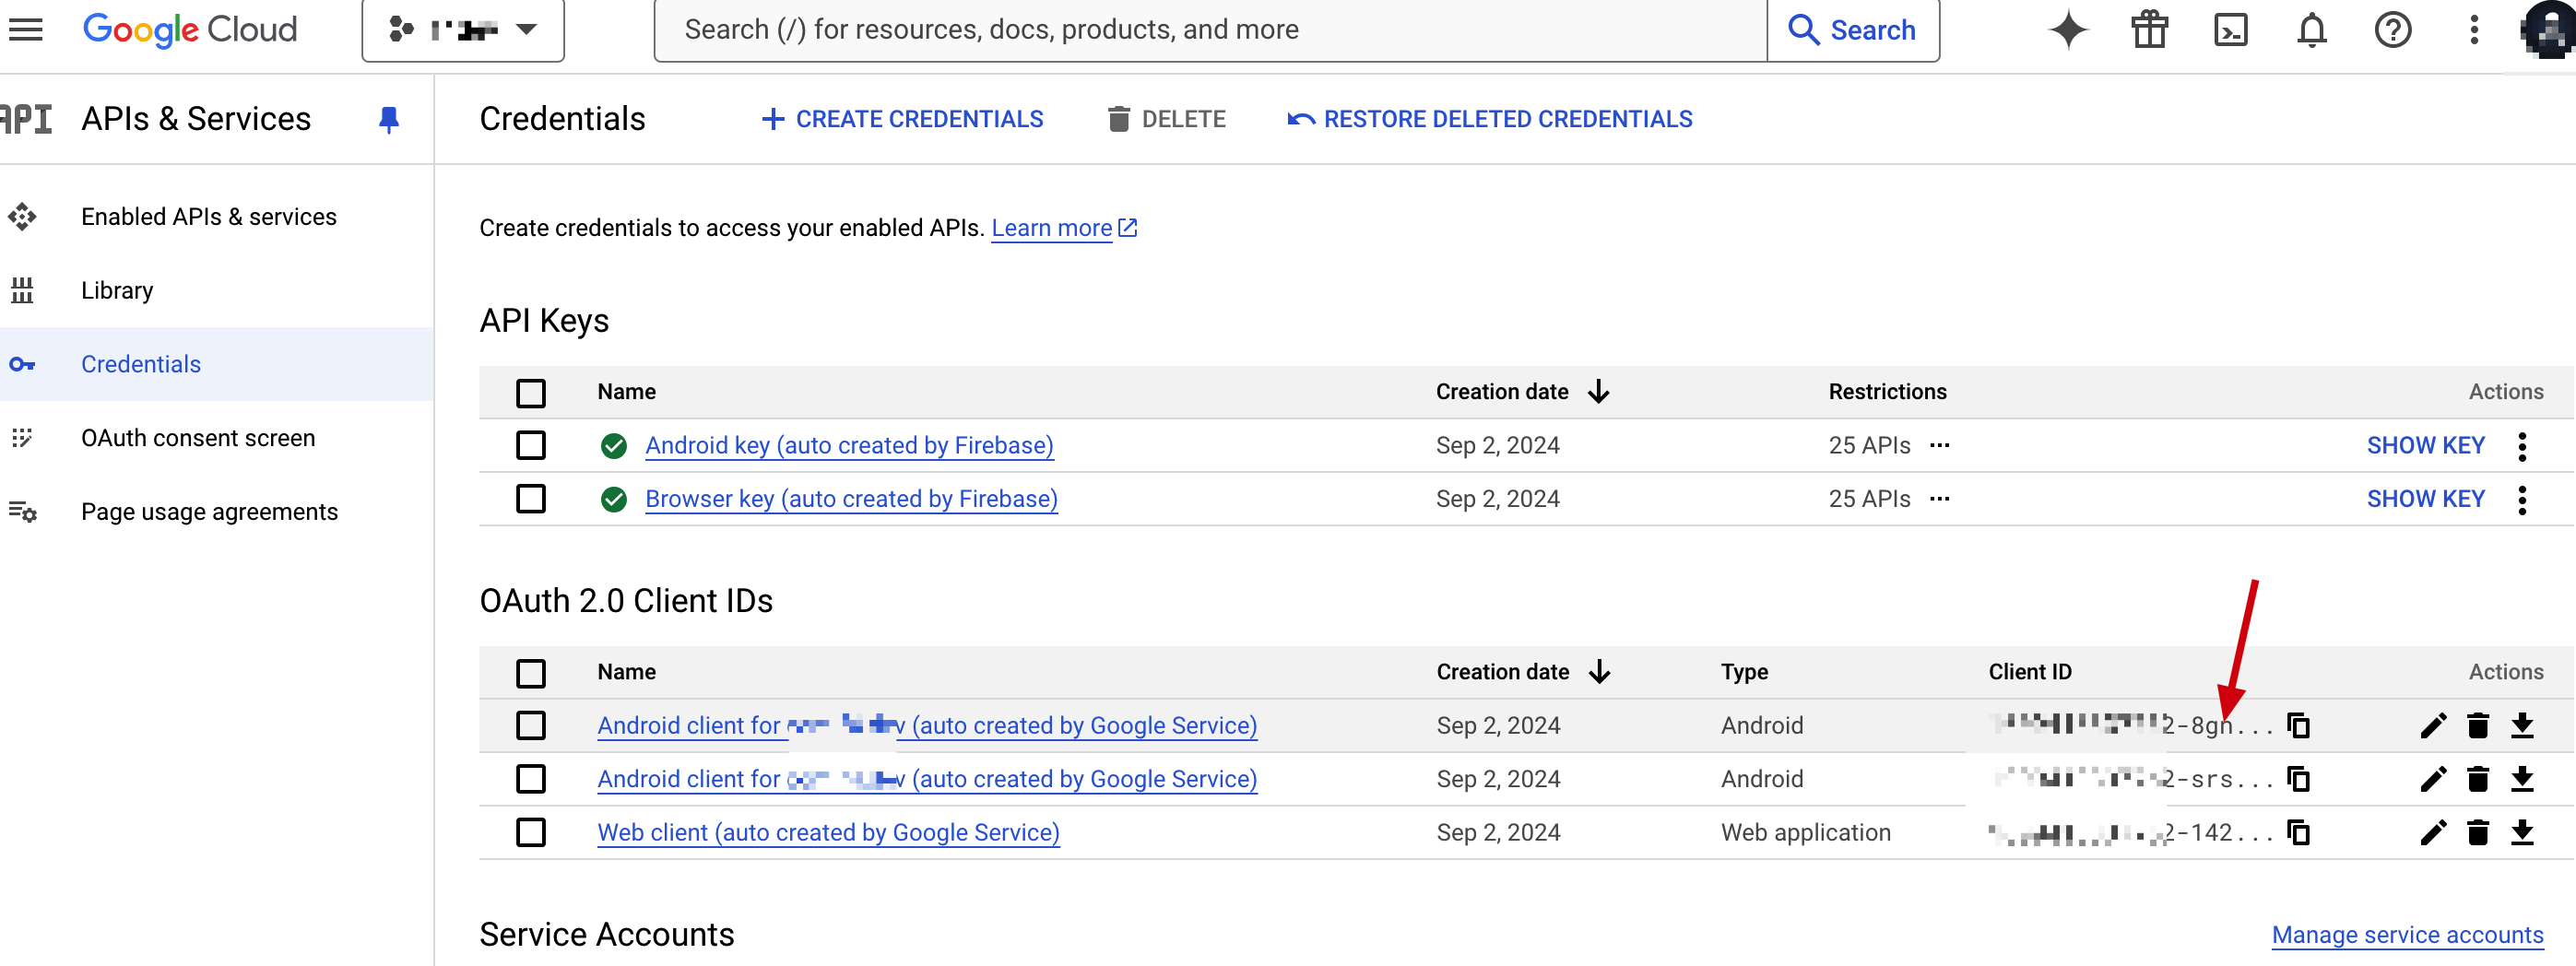
刚创建的项目是没有oauth client id的,所以需要创建一个新的:
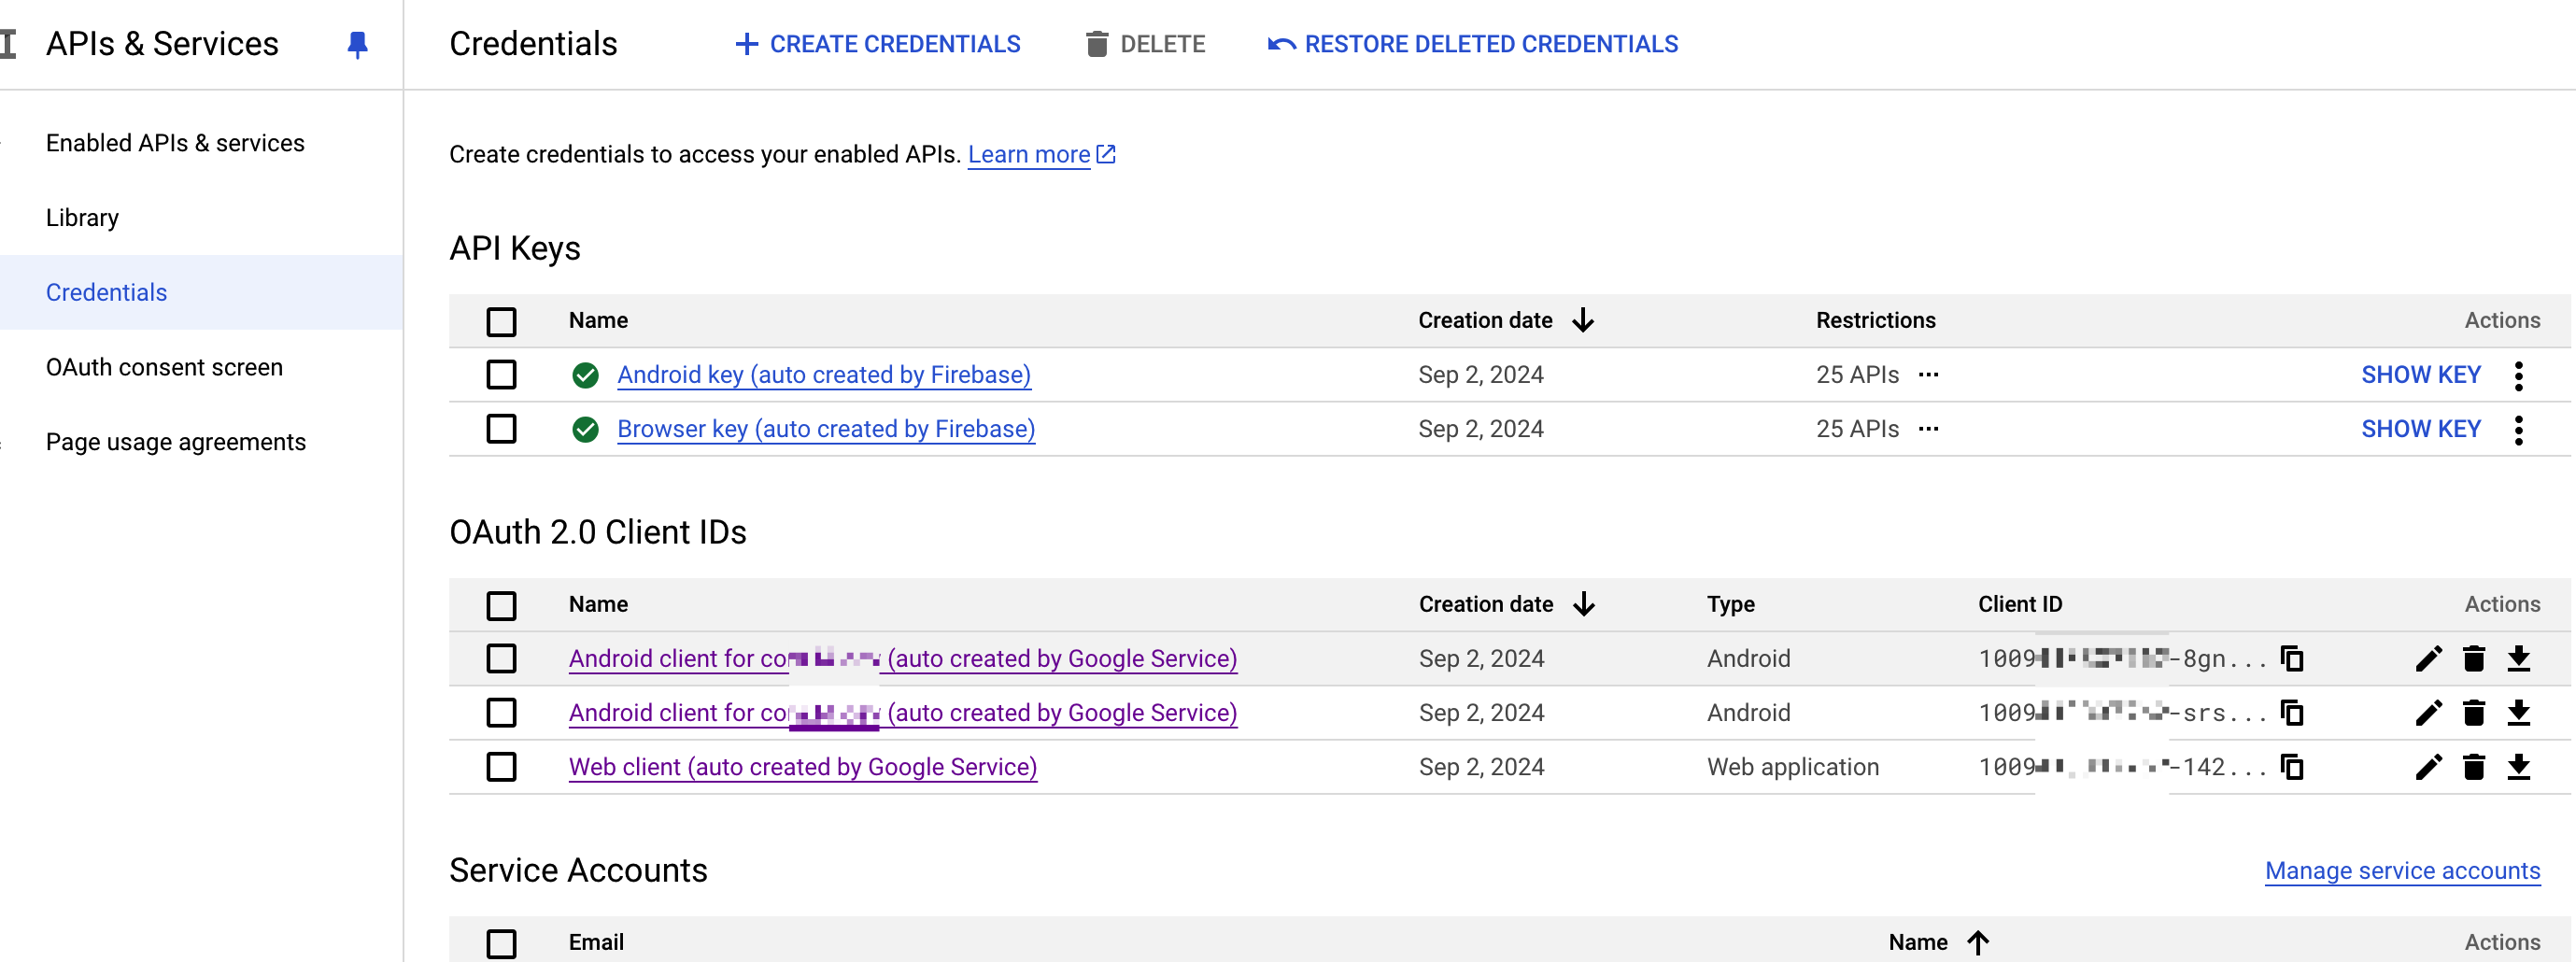
创建完成后会得到client Id(我截图中有firebase自动创建的,这个在下一节会提到,大家可以忽略)
配置授权回调网址,需要进入到OAuth consent Screen,然后点击进入编辑
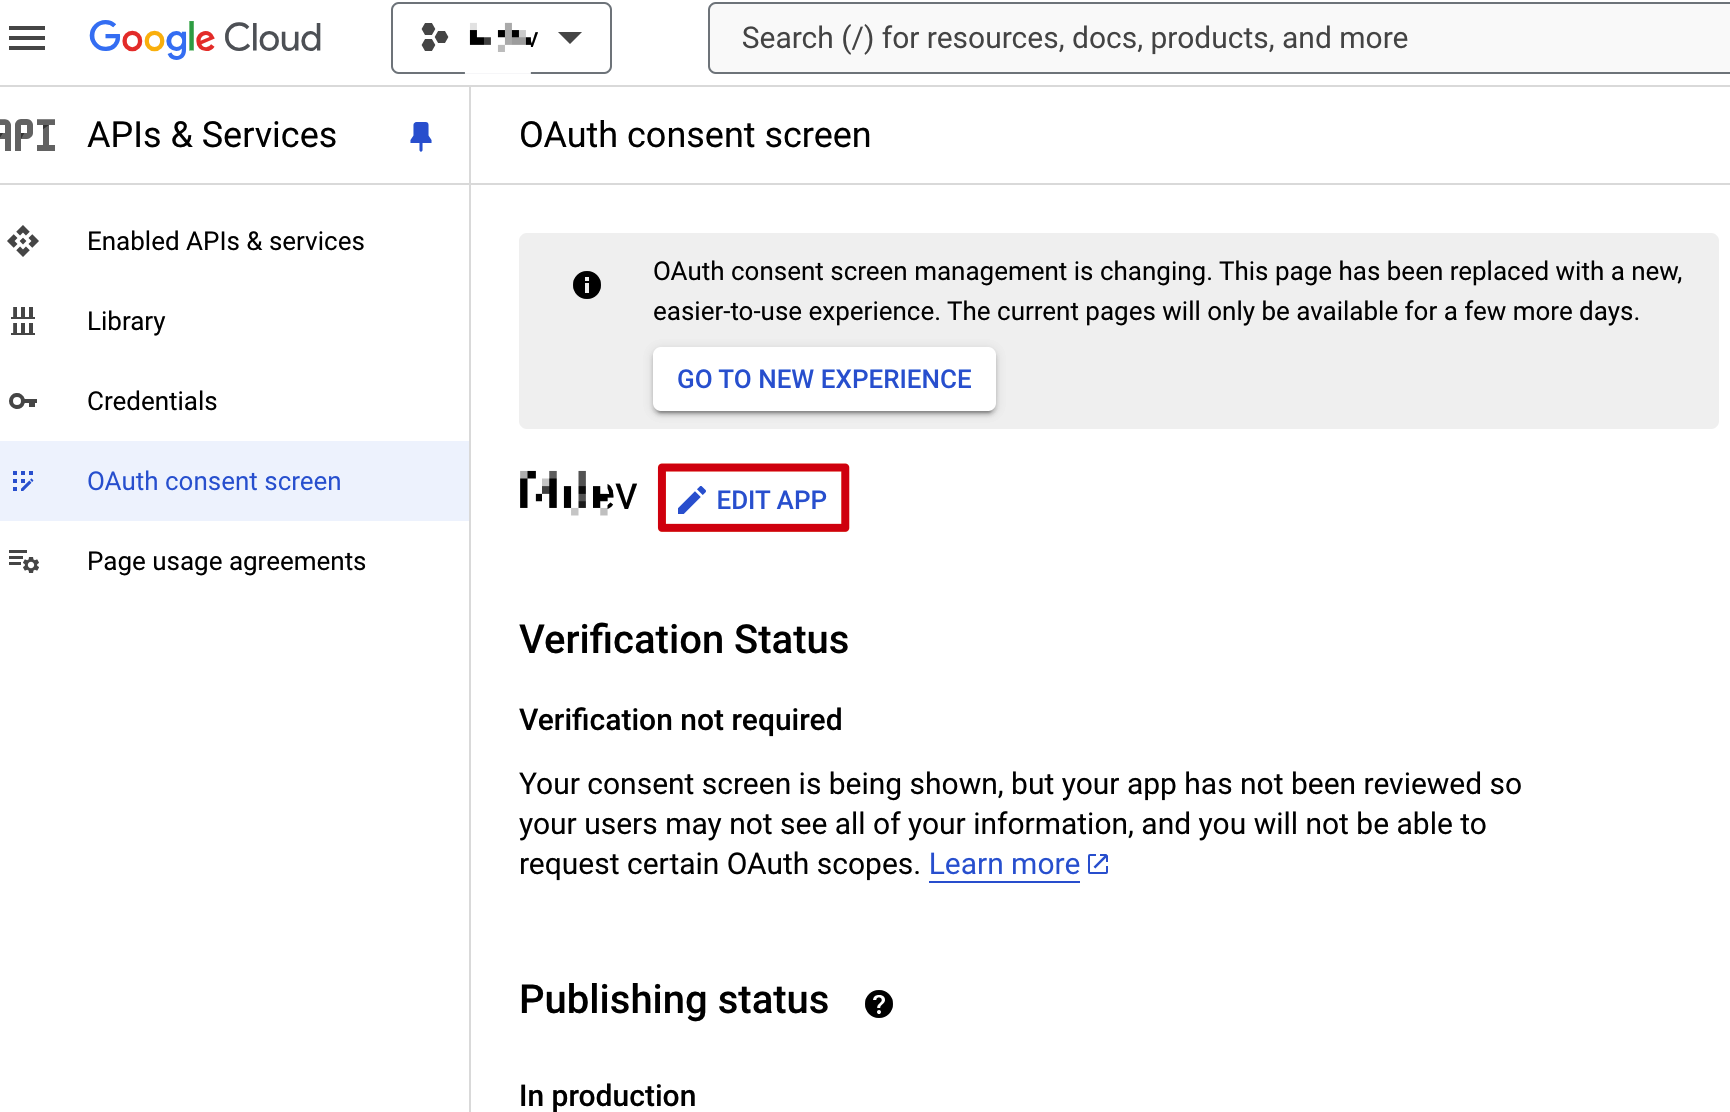
填写授权域名,这里可以填写重定向回调的网址域名,而且只能是顶级域名,当重定向成功后,会跳转到这个顶级域名下的网页(重定向的uri必须是这个顶级域名下的)
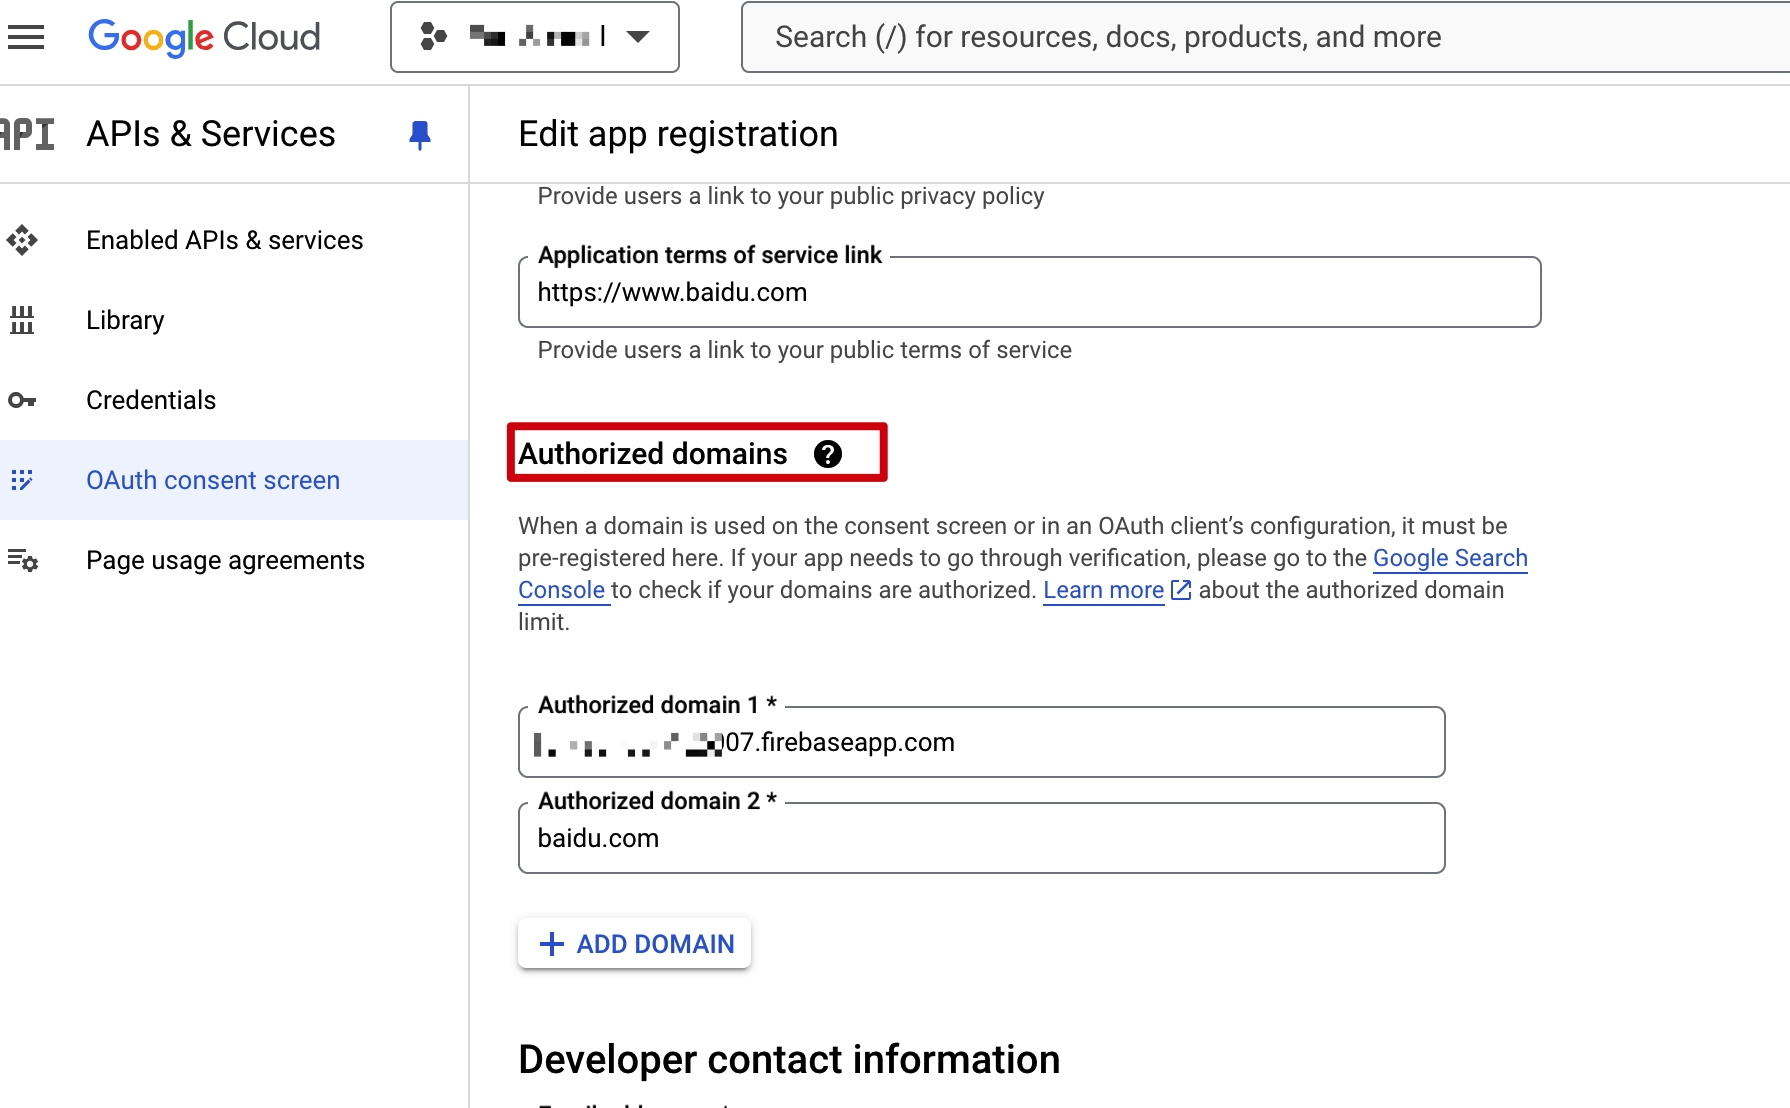
到这里,配置上的事情就结束了。
2.2 发起重定向以及解析授权参数
google.ts
function generateNonce() {
  return [...Array(30)]
    .map(() => Math.floor(Math.random() * 36).toString(36))
    .join('');
}
// 实例化谷歌登录
export const googleSignAction = (callback: (success: boolean, msg?: string, res?: any) => void) => {
            const clientId = "xxx-xxx.apps.googleusercontent.com";
            const url = location.protocol.replaceAll(":", "") + "://" + location.host;
	    const redirectUri = encodeURIComponent(url);
	    const scope = encodeURIComponent("email profile openid");
	    const responseType = "id_token"; // code、access_token
      const nonce = generateNonce(); // id_token 必须要传此字段,且随机

	    const authUrl = `https://accounts.google.com/o/oauth2/v2/auth?client_id=${clientId}&redirect_uri=${redirectUri}&scope=${scope}&response_type=${responseType}&state=google&nonce=${nonce}`;
	    window.location.href = authUrl;
}
提示:这里的ClientId,就是OAuth 2.0 Client IDs中的值
接下来,当重定向成功后,解析我们自己网页中的参数:
google.ts
/**
 * 当Google授权登录成功之后,读取path,从path中获取code,然后发送post请求,获取access token以及id token。
 * - id token用来和firebase进行授权,获取firebase的token。
 * - success:返回从firebase获取到的id token
 */
export const HandleGoogleAuthRedirect = async (path: string, success: (token: string) => void, fail: (err: any) => void) => {
	let searchParams = path
	let searchList = path.split("/#/")
	if (searchList.length > 0) {
		searchParams = searchList[searchList.length - 1]
	}
	searchList = searchParams.split("?")
	if (searchList.length > 0) {
		searchParams = searchList[searchList.length - 1]
	}
	const params = new URLSearchParams(searchParams)
	const idToken = params.get('id_token')
  ...
}
这里的path参考前言一节中的重定向部分,网址携带参数的示例。
这里的idToken就是Google的身份验证得到的标识,然后可以调用后端接口让服务端同学去处理了。
三、前端web开发中实现firebase的Google登录的方法
众所周知,firebase是Google的一个大一统集成平台,firebase上可以集成Crashly、firestore、login等一系列的功能,使用firebase可以很清晰的查看各种统计数据,各个功能的数据可以同步进行对比分析。
所以firebase自然提供了Google登录,当然他还支持Facebook、Apple、Twitter登录等平台。
firebase的web登录同样是会得到一个id token,但是这个id token和Google得到的id token不是同一个字符串,是只针对firebase平台的。
使用firebase登录需要在firebase的console平台上创建项目并且进行配置。
firebase console的链接是:https://console.firebase.google.com/
3.1 创建firebase项目并且配置
进入控制台,创建一个新项目
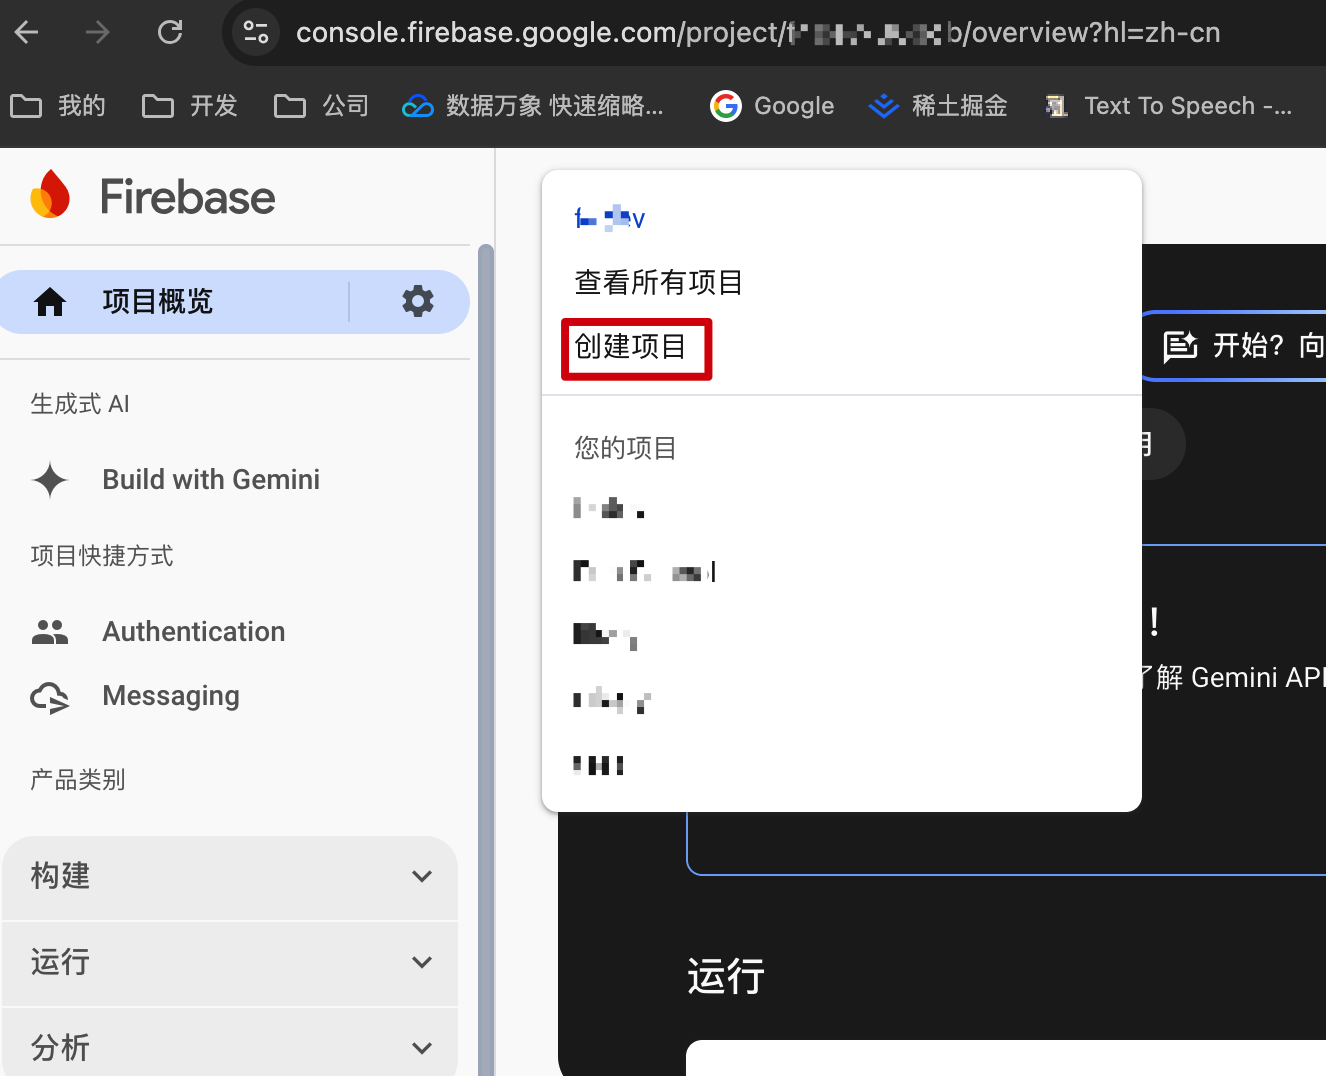
创建完项目后,给这个项目添加web平台
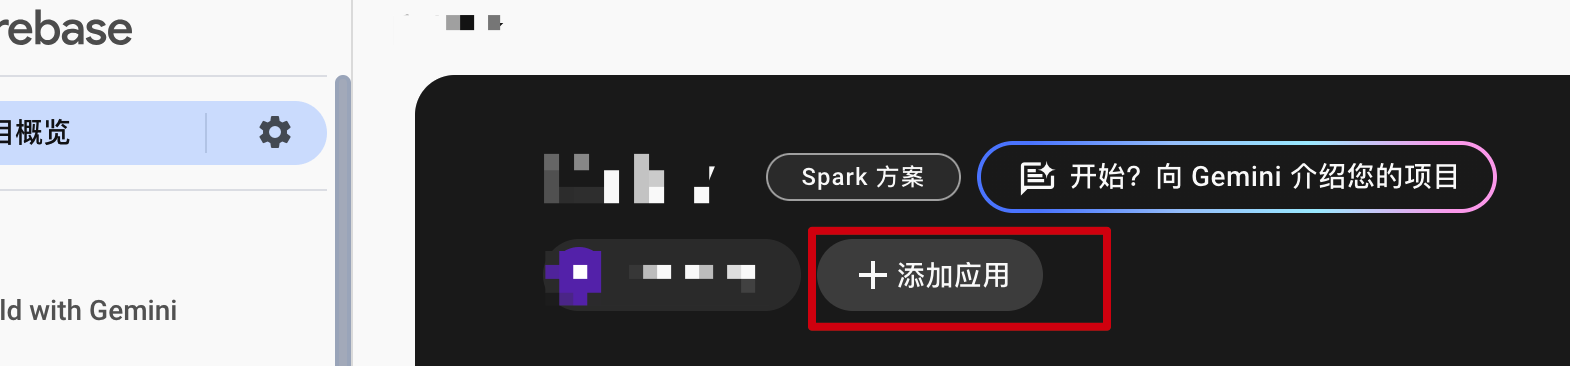
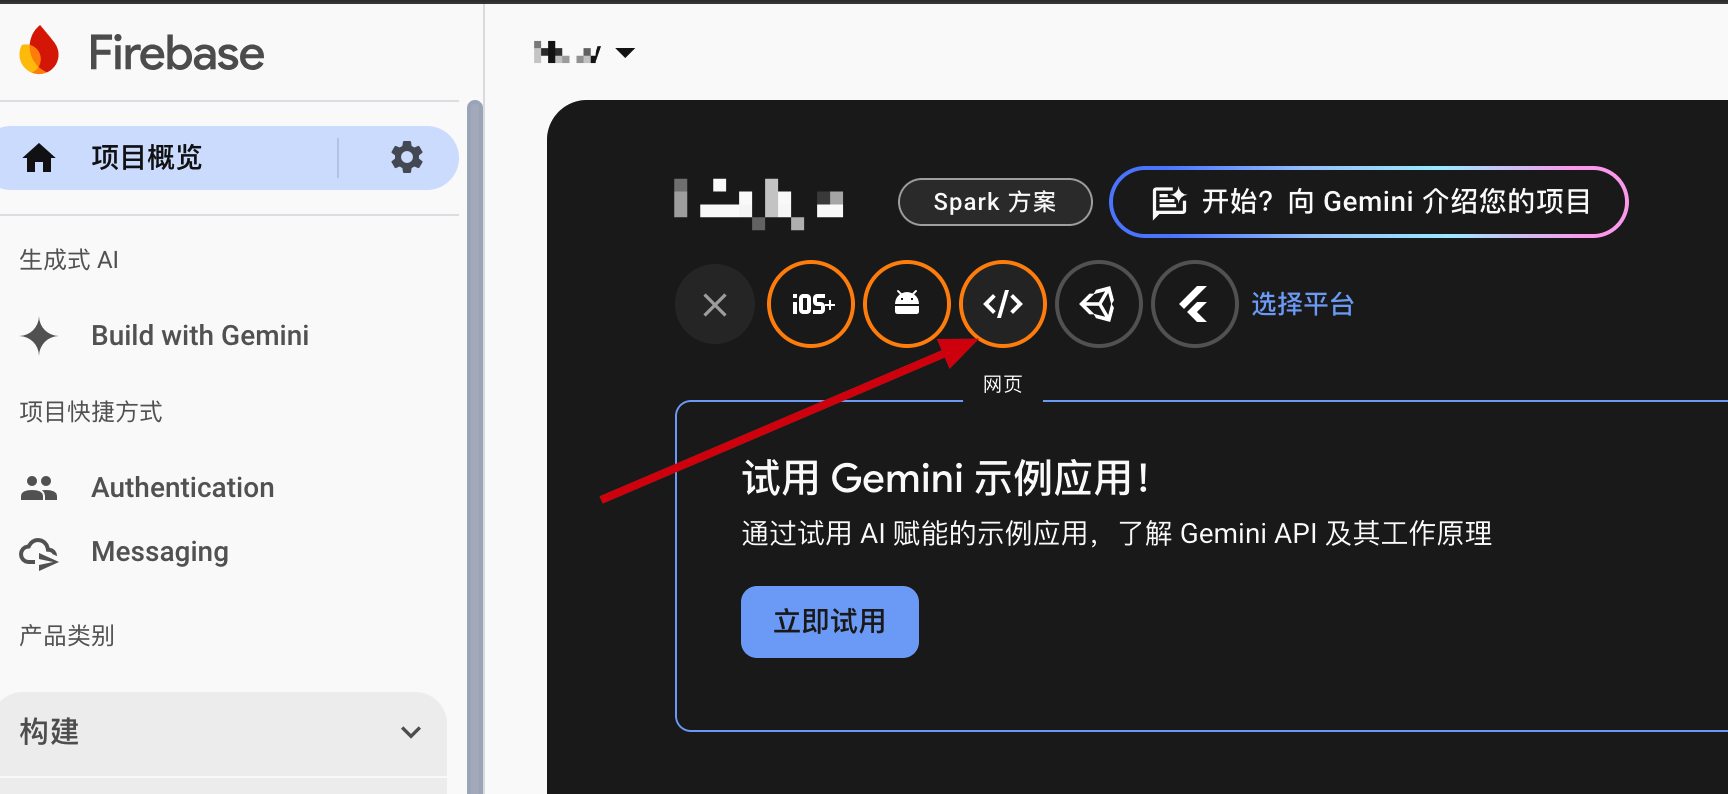
选择添加web平台
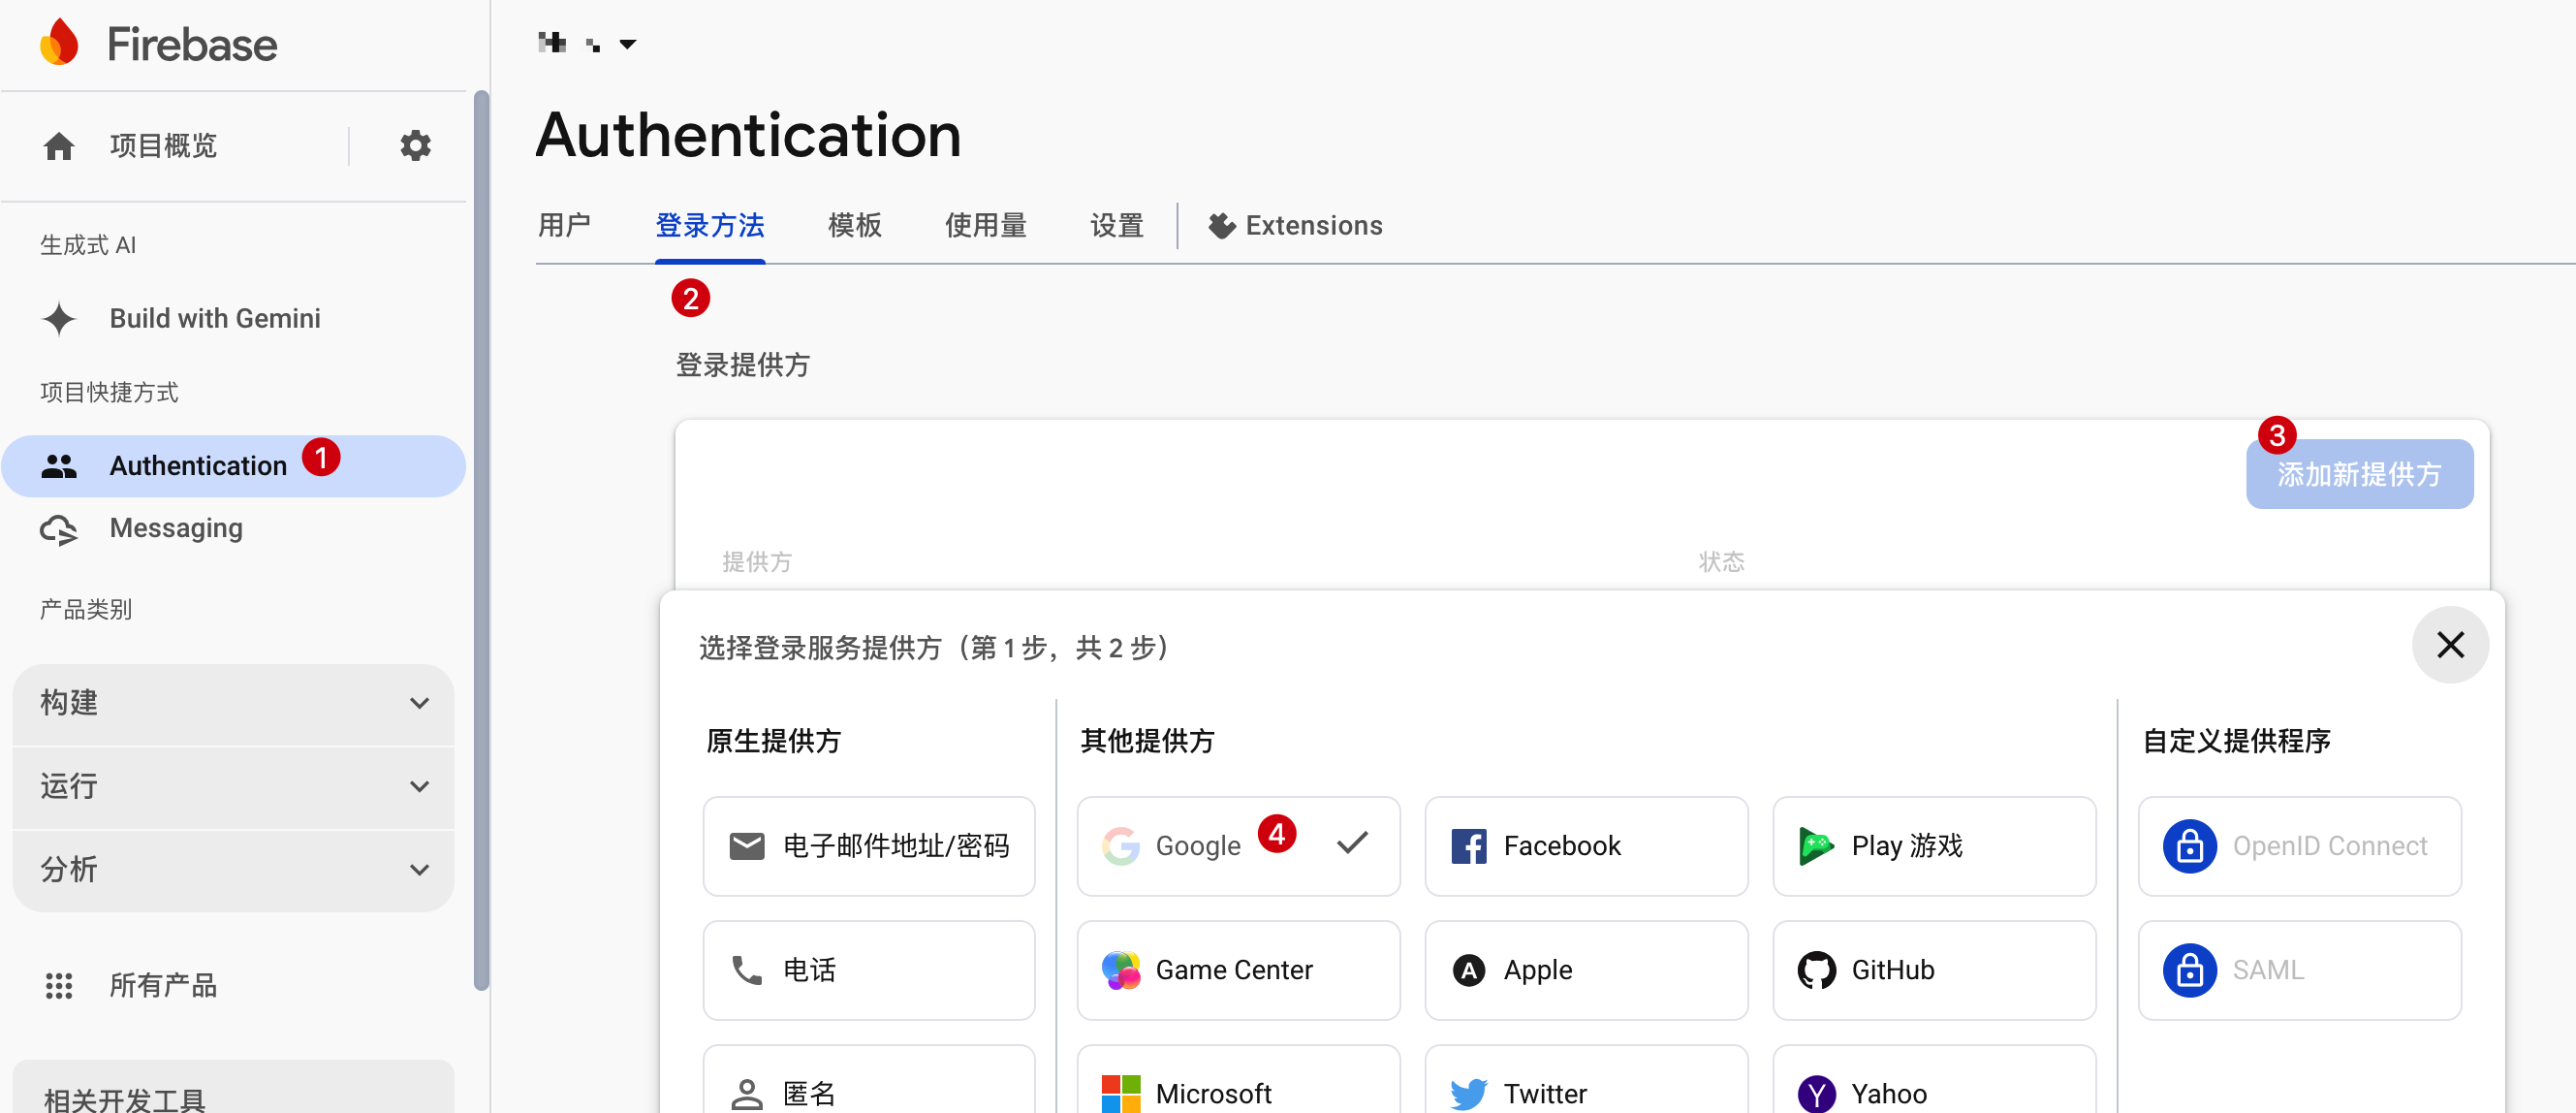
根据以下截图,按照序号顺序,选择使用google作为身份提供方
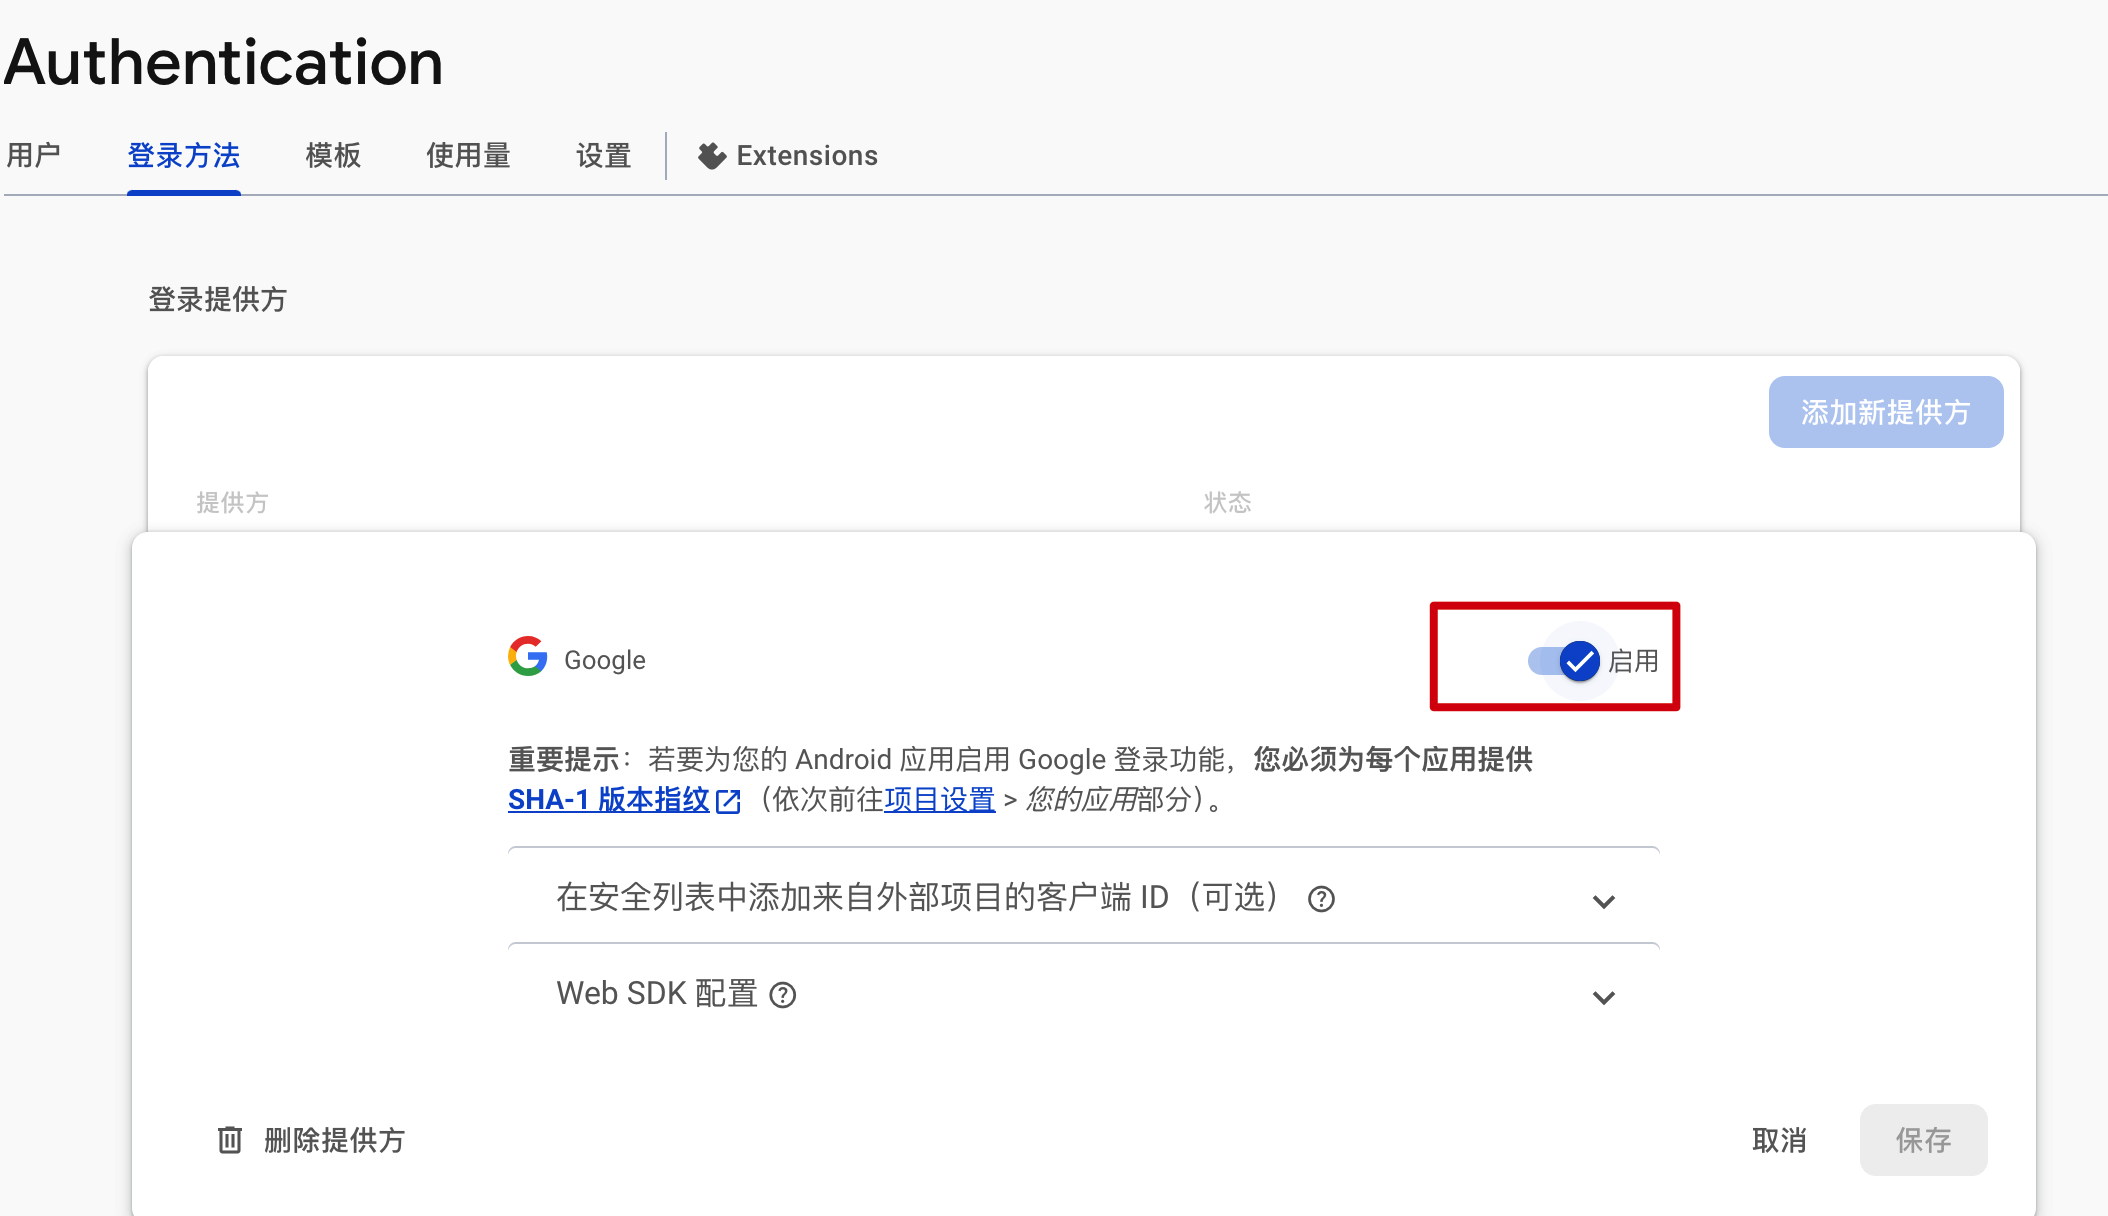
添加完后,进行编辑,一定要选择启用Google
添加授权网域,需要把我们的网页域名添加到这里的“已获授权的网域”
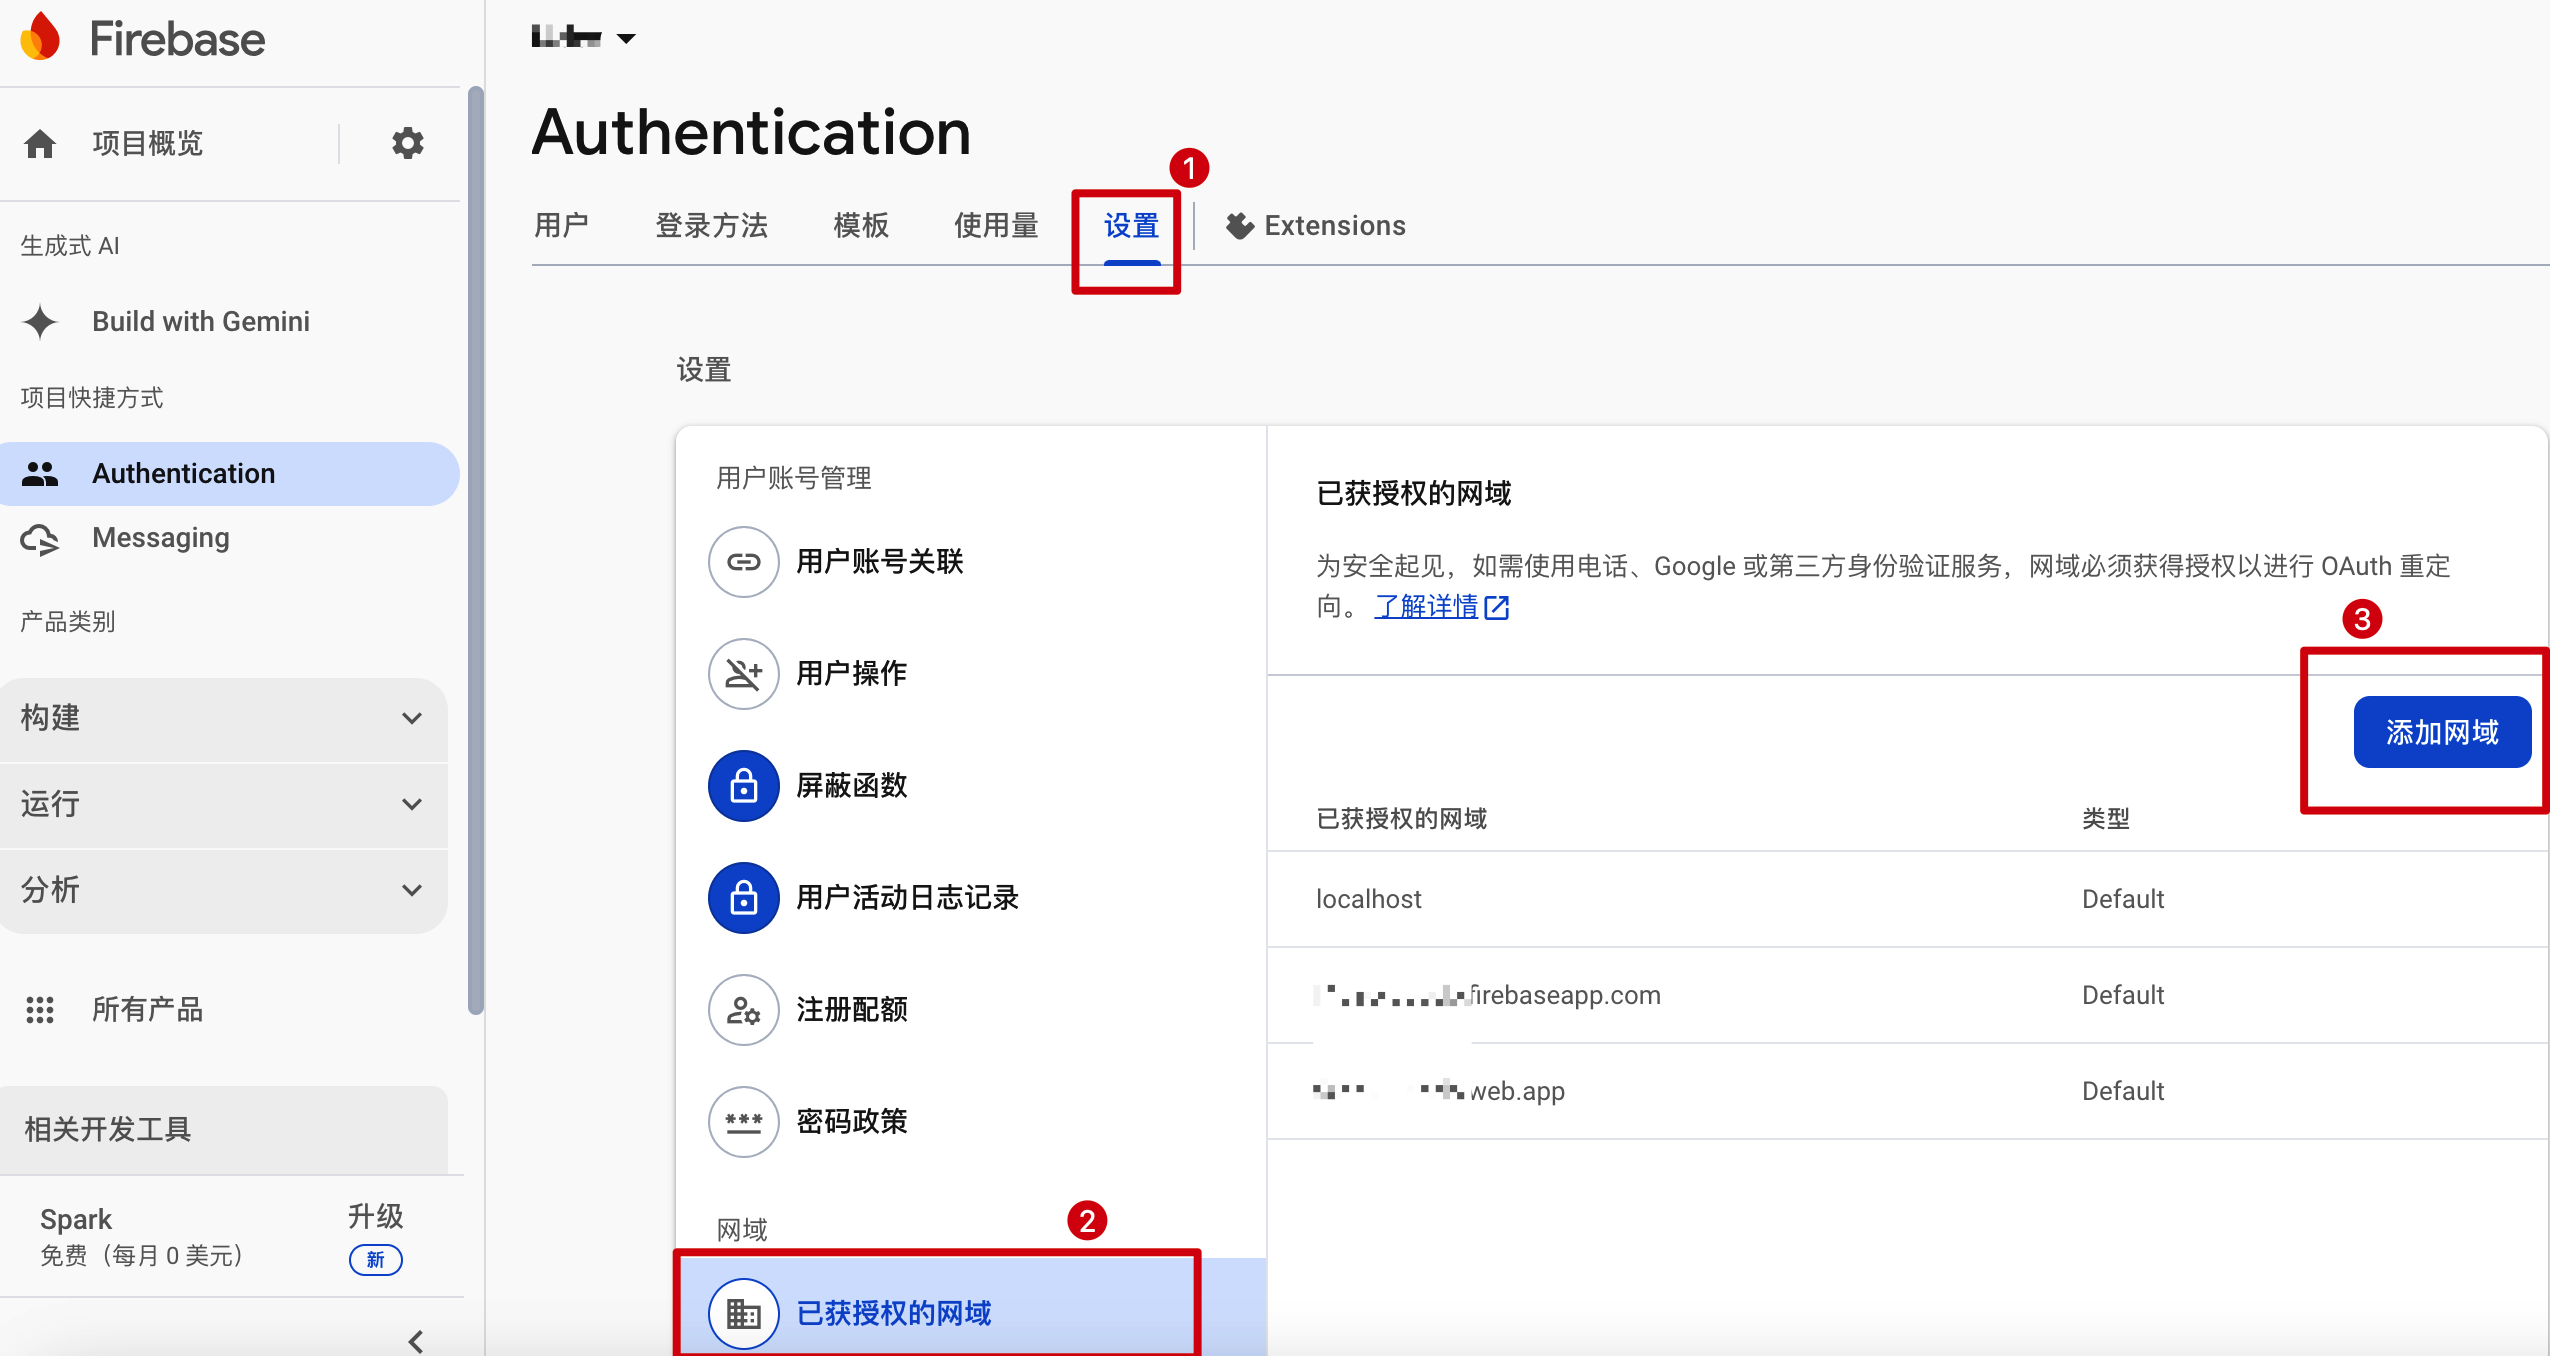
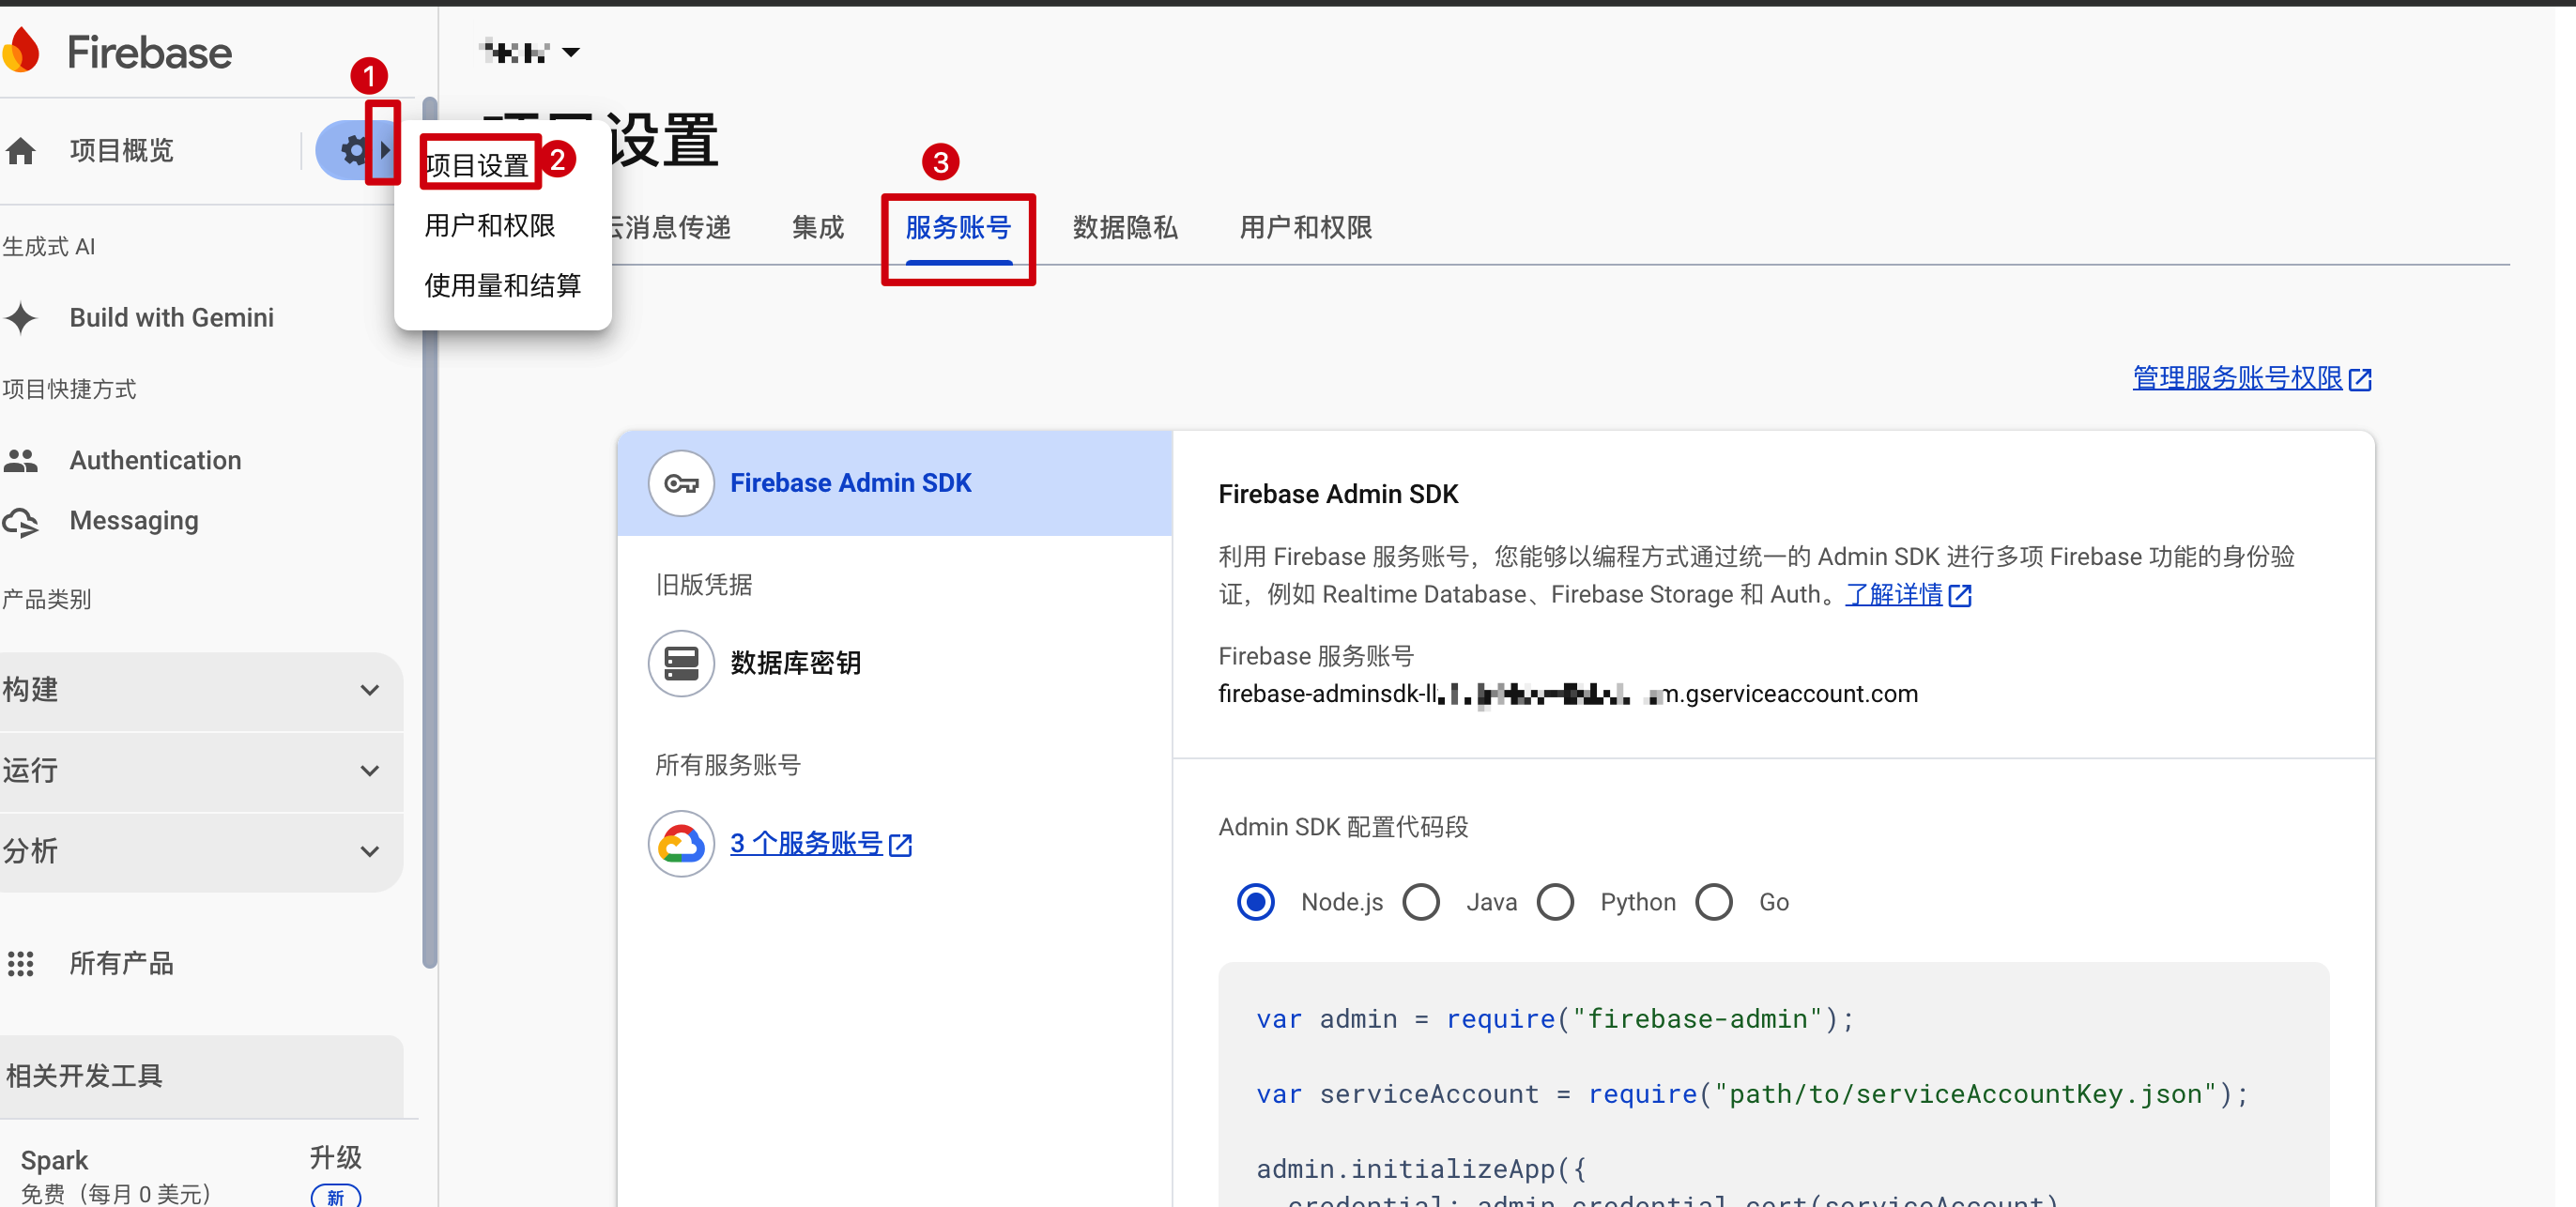
至此,前端相关的配置到这里就结束了,另外提一句,后端需要的文件也在这个控制台里,以下是截图:
3.2 代码使用firebase
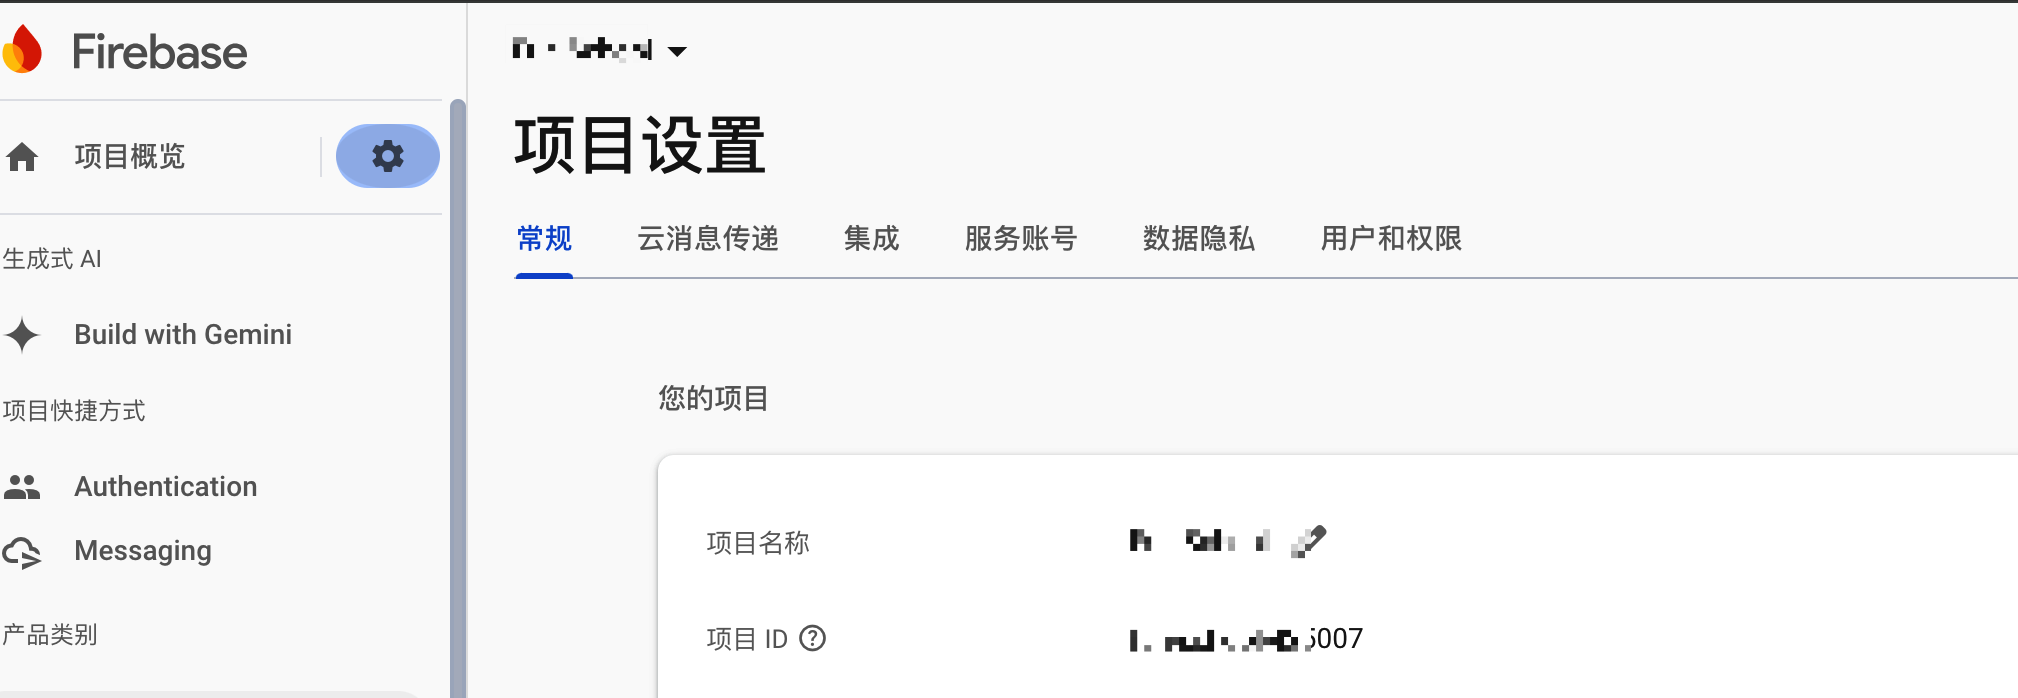
查看前端的firebase集成代码,还是在刚刚的“项目设置”页面下,在“常规”这一项下,滑动到最底部,查看web的集成代码
滚动到最底部的地方,就有集成方式介绍
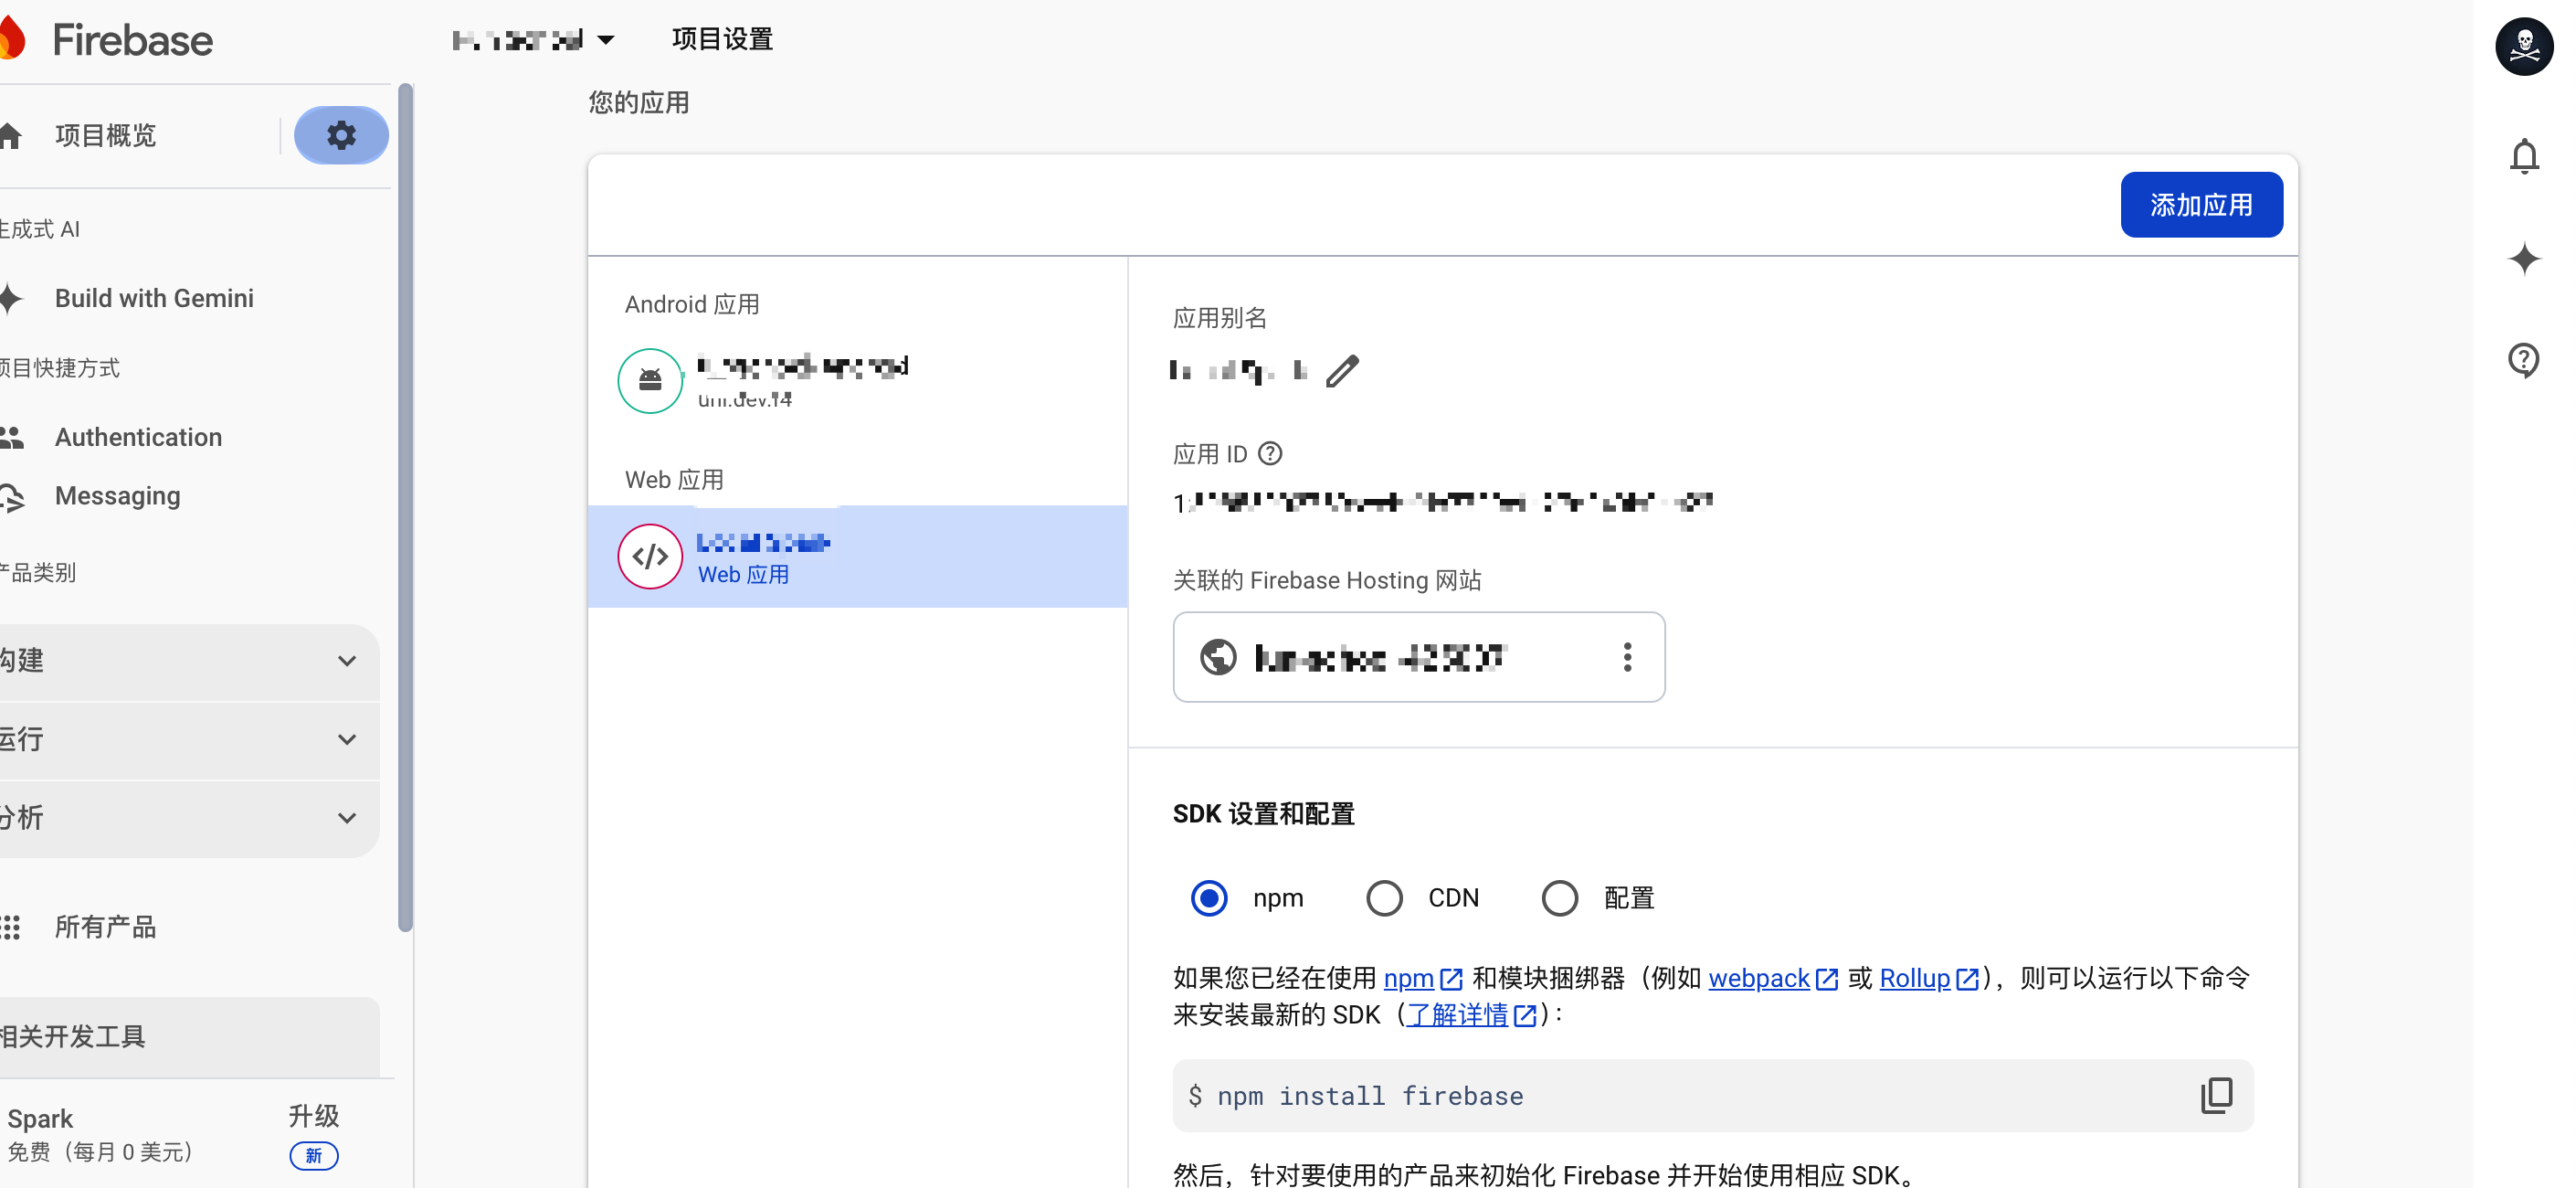
集成后查看package.json文件:
package.json
{
  "dependencies": {
    ...
    "firebase": "^10.12.3",
    ...
  },
  ...
}
我先把firebase的示例代码贴到这里:
firebase.ts
// Import the functions you need from the SDKs you need
import { initializeApp } from "firebase/app";
import { getAnalytics } from "firebase/analytics";
// TODO: Add SDKs for Firebase products that you want to use
// https://firebase.google.com/docs/web/setup#available-libraries

// Your web app's Firebase configuration
// For Firebase JS SDK v7.20.0 and later, measurementId is optional
const firebaseConfig = {
  apiKey: "AxxxxQk",
  authDomain: "xxx.firebaseapp.com",
  projectId: "xxxx",
  storageBucket: "xxx.firebasestorage.app",
  messagingSenderId: "xxxx",
  appId: "1:xxxx:web:xxxx",
  measurementId: "G-xxx"
};

// Initialize Firebase
const app = initializeApp(firebaseConfig);
const analytics = getAnalytics(app);我们这里由于使用到了Google的身份验证,所以其实需要引入firebase的Google提供API,所以我贴一下我自己的代码:(GetCurrentFirebase表示的就是上面示例中的firebaseConfig)
示例.ts
import { initializeApp } from "firebase/app";
import { getAuth, signInWithPopup, GoogleAuthProvider } from "firebase/auth";
import { GetCurrentFirebase } from "../../../env/firebase";

const firebaseConfig = GetCurrentFirebase()

const app = initializeApp(firebaseConfig);
const auth = getAuth(app);
const provider = new GoogleAuthProvider();

export { auth, provider, signInWithPopup, GoogleAuthProvider };
然后我们在点击按钮后,要唤起授权弹窗:
示例.ts
...
import { auth, provider, signInWithPopup, GoogleAuthProvider  } from "./firebase";
...

const onClickGoogleBtn = (callback: (success: boolean, msg?: string, res?: any) => void) => {
  signInWithPopup(auth, provider)
	  .then(async (result) => {
		  console.log("Google授权登录获取到的值是:", res);
		  if (result && result.user) {
			  const user = result.user;
			  user.getIdToken(true).then((id_token) => {
                              callback(true, id_token, res)
			  }).catch(error => {
                              callback(false, typeof error == 'string' ? error : (error.message || error.msg));
			  });
		  } else {
			  callback(false, TXT_PleaseTryAgain);
		  }
	  })
	  .catch((error) => {
		console.log("Google授权登录失败是:", error);
		callback(false, typeof error == 'string' ? error : (error.message || error.msg));
	  });
}
这样就能获取到firebase的id token了,但是这种方式就是通过弹窗授权的方式,而弹窗授权在一些设备的浏览器或者某些app的webview中显示时,弹窗会被禁止,从而导致弹窗授权失败。
所以我们必须得使用一个不使用弹窗的授权方式,保证授权登录能成功。
我看了firebase的很多文档,他们虽然提供了fireabse的重定向登录方式,但是对于fireabse的验证有诸多限制,是不容易实现的。
firebase的官方集成文档的几种方式:https://firebase.google.com/docs/auth/web/redirect-best-practices?hl=zh-cn
总结来说,firebase的重定向方式有以下几种:
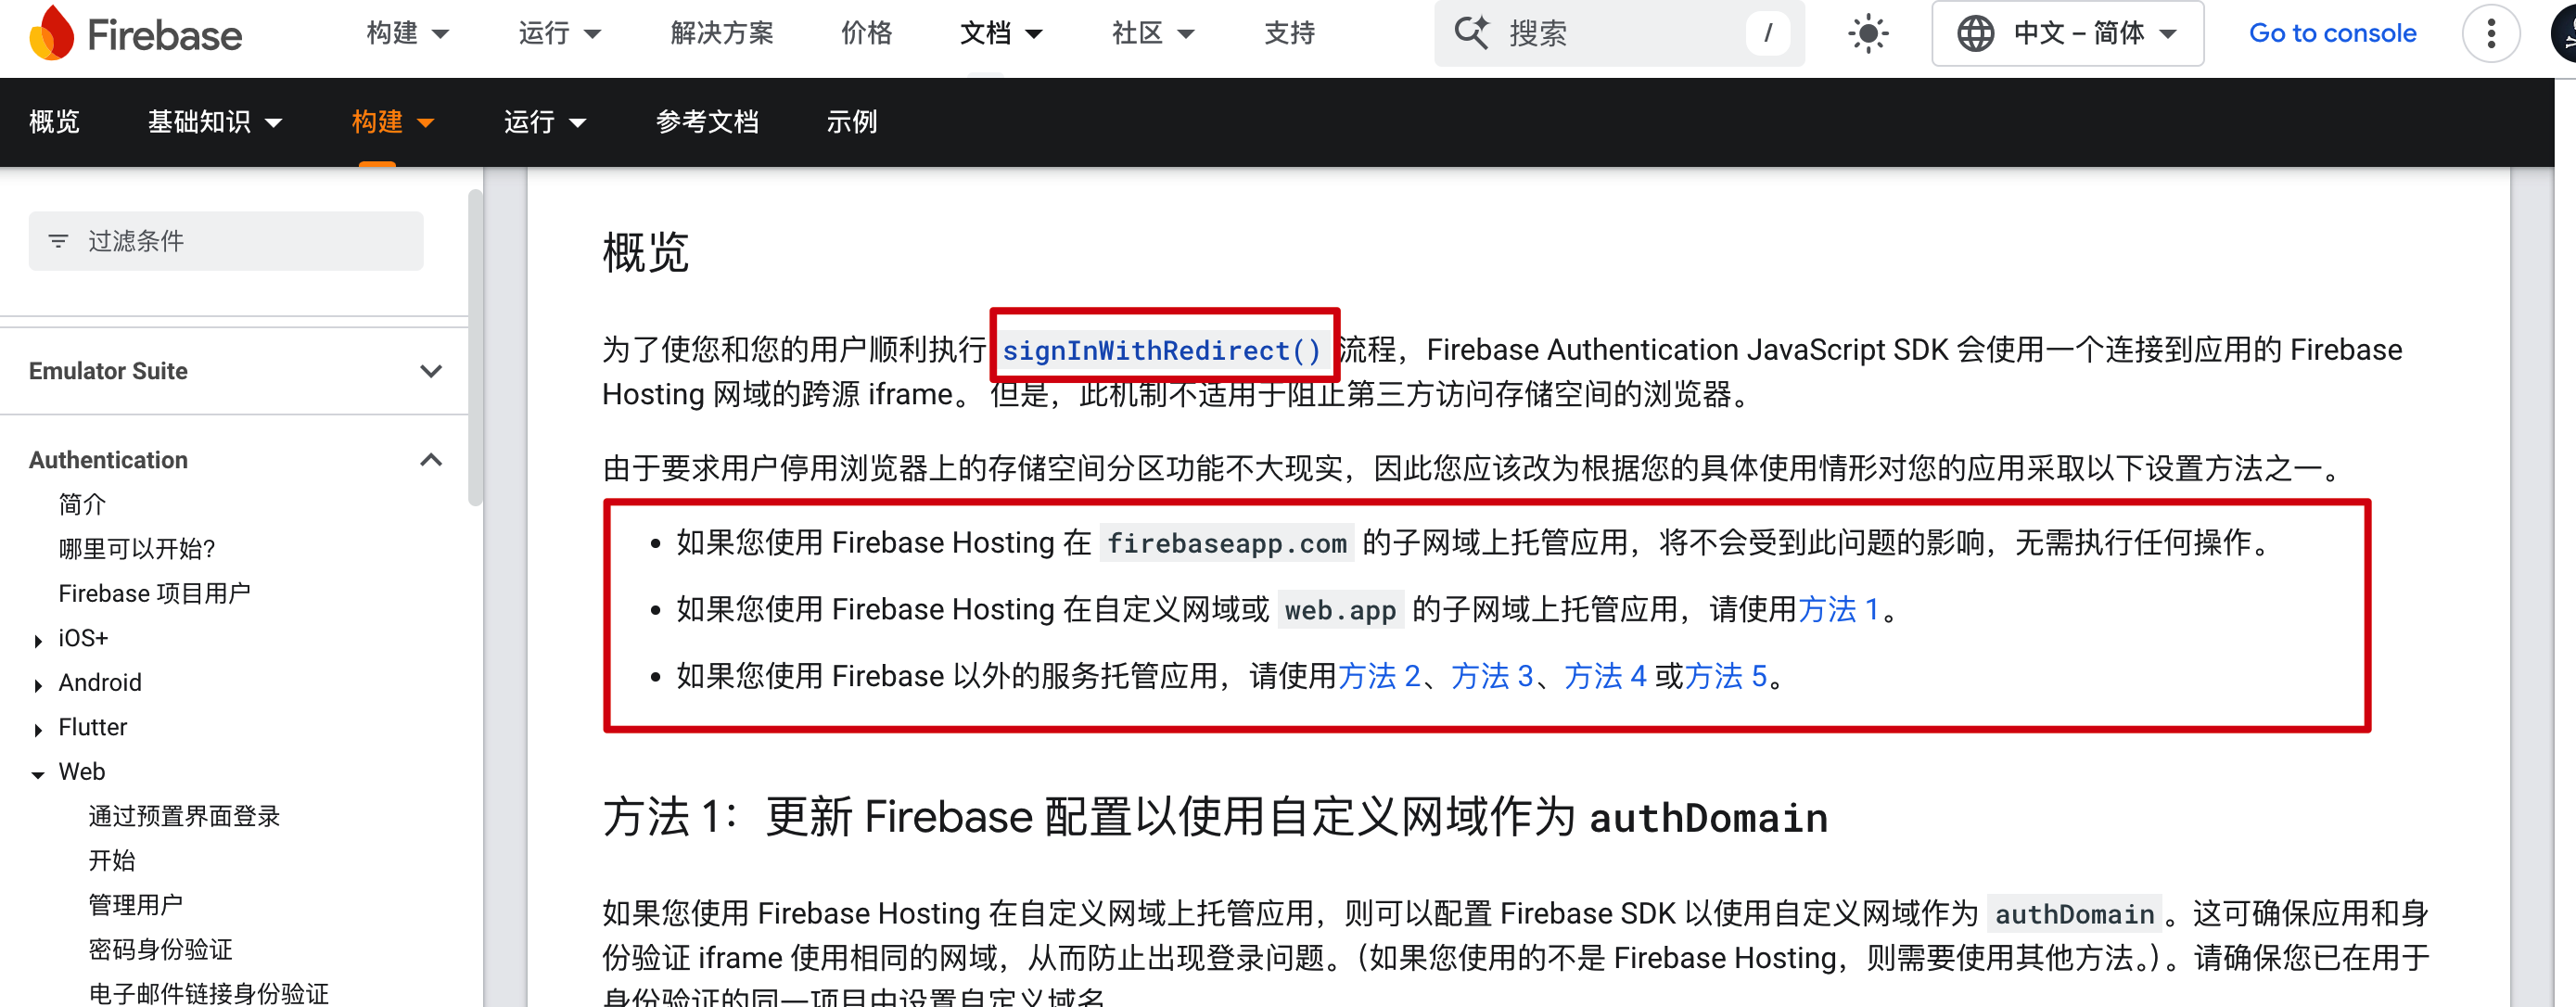
其实就一句话,那就是如果只使用firebase的方式进行Google授权,而且使用重定向的方式,那么服务端要么使用firebase Hosting,要么自行托管firebase授权文件。
所以仅仅靠firebase实现Google的授权重定向登录,是不够的,下一节我们会说到。
四、结合Google授权登录、firebase身份转换达到获取firebase的id token
从这一节的标题看,相信大家已经知道如何去优雅的实现一个firebase的Google重定向登录。而且只需要使用第二、三种的代码,稍加改进就可以实现。
总的流程就是:
- 使用Google的重定向获取Google的id token;
- 使用firebase的身份credential将Google的id token转成firebase的id token。
第一步,通过第二节的代码,就可以得到,所以这里不再赘述。
第二步,将firebase的授权登录代码,改造一下:
firebase.ts
...
import { signInWithCredential } from "firebase/auth";
import { auth, GoogleAuthProvider  } from "./firebase";
...

        const params = new URLSearchParams(searchParams)
	const idToken = params.get('id_token')
	if (idToken != null && idToken.length > 0) {
		const credential = GoogleAuthProvider.credential(idToken);
		const result = await signInWithCredential(auth, credential);
		const user = result.user;
		user.getIdToken(true).then((token) => {
			// 这里获取到的就是firebase 的 id token
			success(token);
		}).catch(error => {
			// 这里就是出错了
			fail(error)
		});
	}
...上面的这个代码,大家应该能看懂吧,auth和GoogleAuthProvider,是在第三章的代码中export的,这里从firebase库中引入了signInWithCredential了。
全篇就写到这里,希望对大家有帮助。
Keine Kommentare, erstmals kommentieren.